How-to — task-oriented recipe.
Overview
Importing your LinkedIn connections into Affinity gives your team visibility into your collective professional network, making it easy to identify warm introduction paths to target companies and people without leaving your CRM. What it does: Uploads your LinkedIn connections from a CSV file, adding them to Affinity where your team can:- See WHO is connected via the LinkedIn Network tab (GA feature)
- Filter Lists by LinkedIn connectivity (GA feature)
- Query connections using AI Chat (GA feature)
- Leverage existing relationships for deal flow
Why Import LinkedIn Connections?
The Problem: Hidden Networks
Your professional network extends far beyond your email contacts. LinkedIn connections represent thousands of relationships that don’t appear in Affinity because you haven’t emailed them recently — or ever. This creates blind spots: Before importing:- “Who at our firm knows the CEO of Company X?” → Toggle between Affinity and LinkedIn to check
- “Do we have any paths to this prospect?” → Manually ask teammates if they’re connected
- “Which portfolio CEOs can introduce us?” → Cross-reference LinkedIn separately
- See your team’s collective LinkedIn network directly on company profiles
- Blue LinkedIn badges show who at your firm is connected
What You’ll Unlock
Target Discovery: When viewing a target company in Affinity, immediately see which teammates are LinkedIn connected to people at that company. Click “Connection” on the badge to see exactly WHO is connected. Complete Network View: Your firm’s relationship intelligence now includes both interaction data (emails, meetings) AND LinkedIn connections. This gives you a comprehensive view of who your team knows, not just who they’ve recently contacted. AI Chat Integration (GA): Query your team’s LinkedIn network using AI Chat: “Who on our team knows people at Sequoia Capital?” Chat combines LinkedIn data with Affinity’s relationship intelligence to surface warm paths you might have missed. Faster Sourcing with List Filters (GA): Use the “LinkedIn Connected To” filter on Lists to instantly see which target companies have connections from your team. Team Coordination: Stop duplicate outreach and leverage existing relationships. The LinkedIn Network tab shows who’s connected, helping you coordinate relationship-driven deal flow across your team.How to Download Your LinkedIn Connections CSV
LinkedIn provides a data export feature that creates a CSV file of all your connections.Step 1: Request Your Data from LinkedIn
- Go to LinkedIn.com and log in to your account.
- Click your profile photo (top right) > Settings & Privacy.
- Navigate to Data Privacy (left sidebar).
- Click Download your data.
- Select Download larger data archives (as this is what will get you the Connections data).
- Click Request archive.
- LinkedIn will email you when your data is ready (because you’re downloading the larger data archive, it can take anywhere between 24-48 hours and may involve LinkedIn sending your data in two parts).
Step 2: Download the CSV File
- Check your email for “Your LinkedIn data is ready”.
- Click Download archive in the email.
- Log in to LinkedIn if prompted.
- Click Download on the data archive page.
- A ZIP file downloads to your computer.
- Unzip the file to extract the CSV.
Connections.csv inside the extracted folder.
Step 3: Verify Your CSV is Ready
Before uploading to Affinity, confirm:- You are uploading a CSV exported from LinkedIn
- You removed people you do not want to upload
- Your CSV files includes the original column headers
- Required: Your CSV has a LinkedIn URL corresponding to each person row
- First Name
- Last Name
- LinkedIn URL
- Connected on (date)
How to Import LinkedIn Connections into Affinity
Step 1: Navigate to LinkedIn Data Settings
- In Affinity, go to Settings (left navigation).
- Scroll to LinkedIn Data section.
- Click Import Connections.
Step 2: Upload Your CSV File

- Drag and drop your
Connections.csvfile into the upload area.- OR click Browse to select the file.
- Wait for file validation (a few seconds).
- Select date format from dropdown (GA requirement).
- Affinity detects formats from your CSV.
- Choose the format LinkedIn used in “Connected On” column.
- Common formats: MM/DD/YYYY, DD/MM/YYYY.
- If unsure: Open CSV in Excel/Sheets to check date format.
- Important: Wrong format may cause upload failures.
- System confirms CSV has required columns.
- Maximum size: 10MB
- Format: CSV from LinkedIn export
- Up to 25,000 connections supported
- Verify file is under 10MB.
- Confirm it’s the Connections CSV from LinkedIn (not a different export).
- Try re-downloading from LinkedIn if file appears corrupted.
Step 3: Configure Import Details
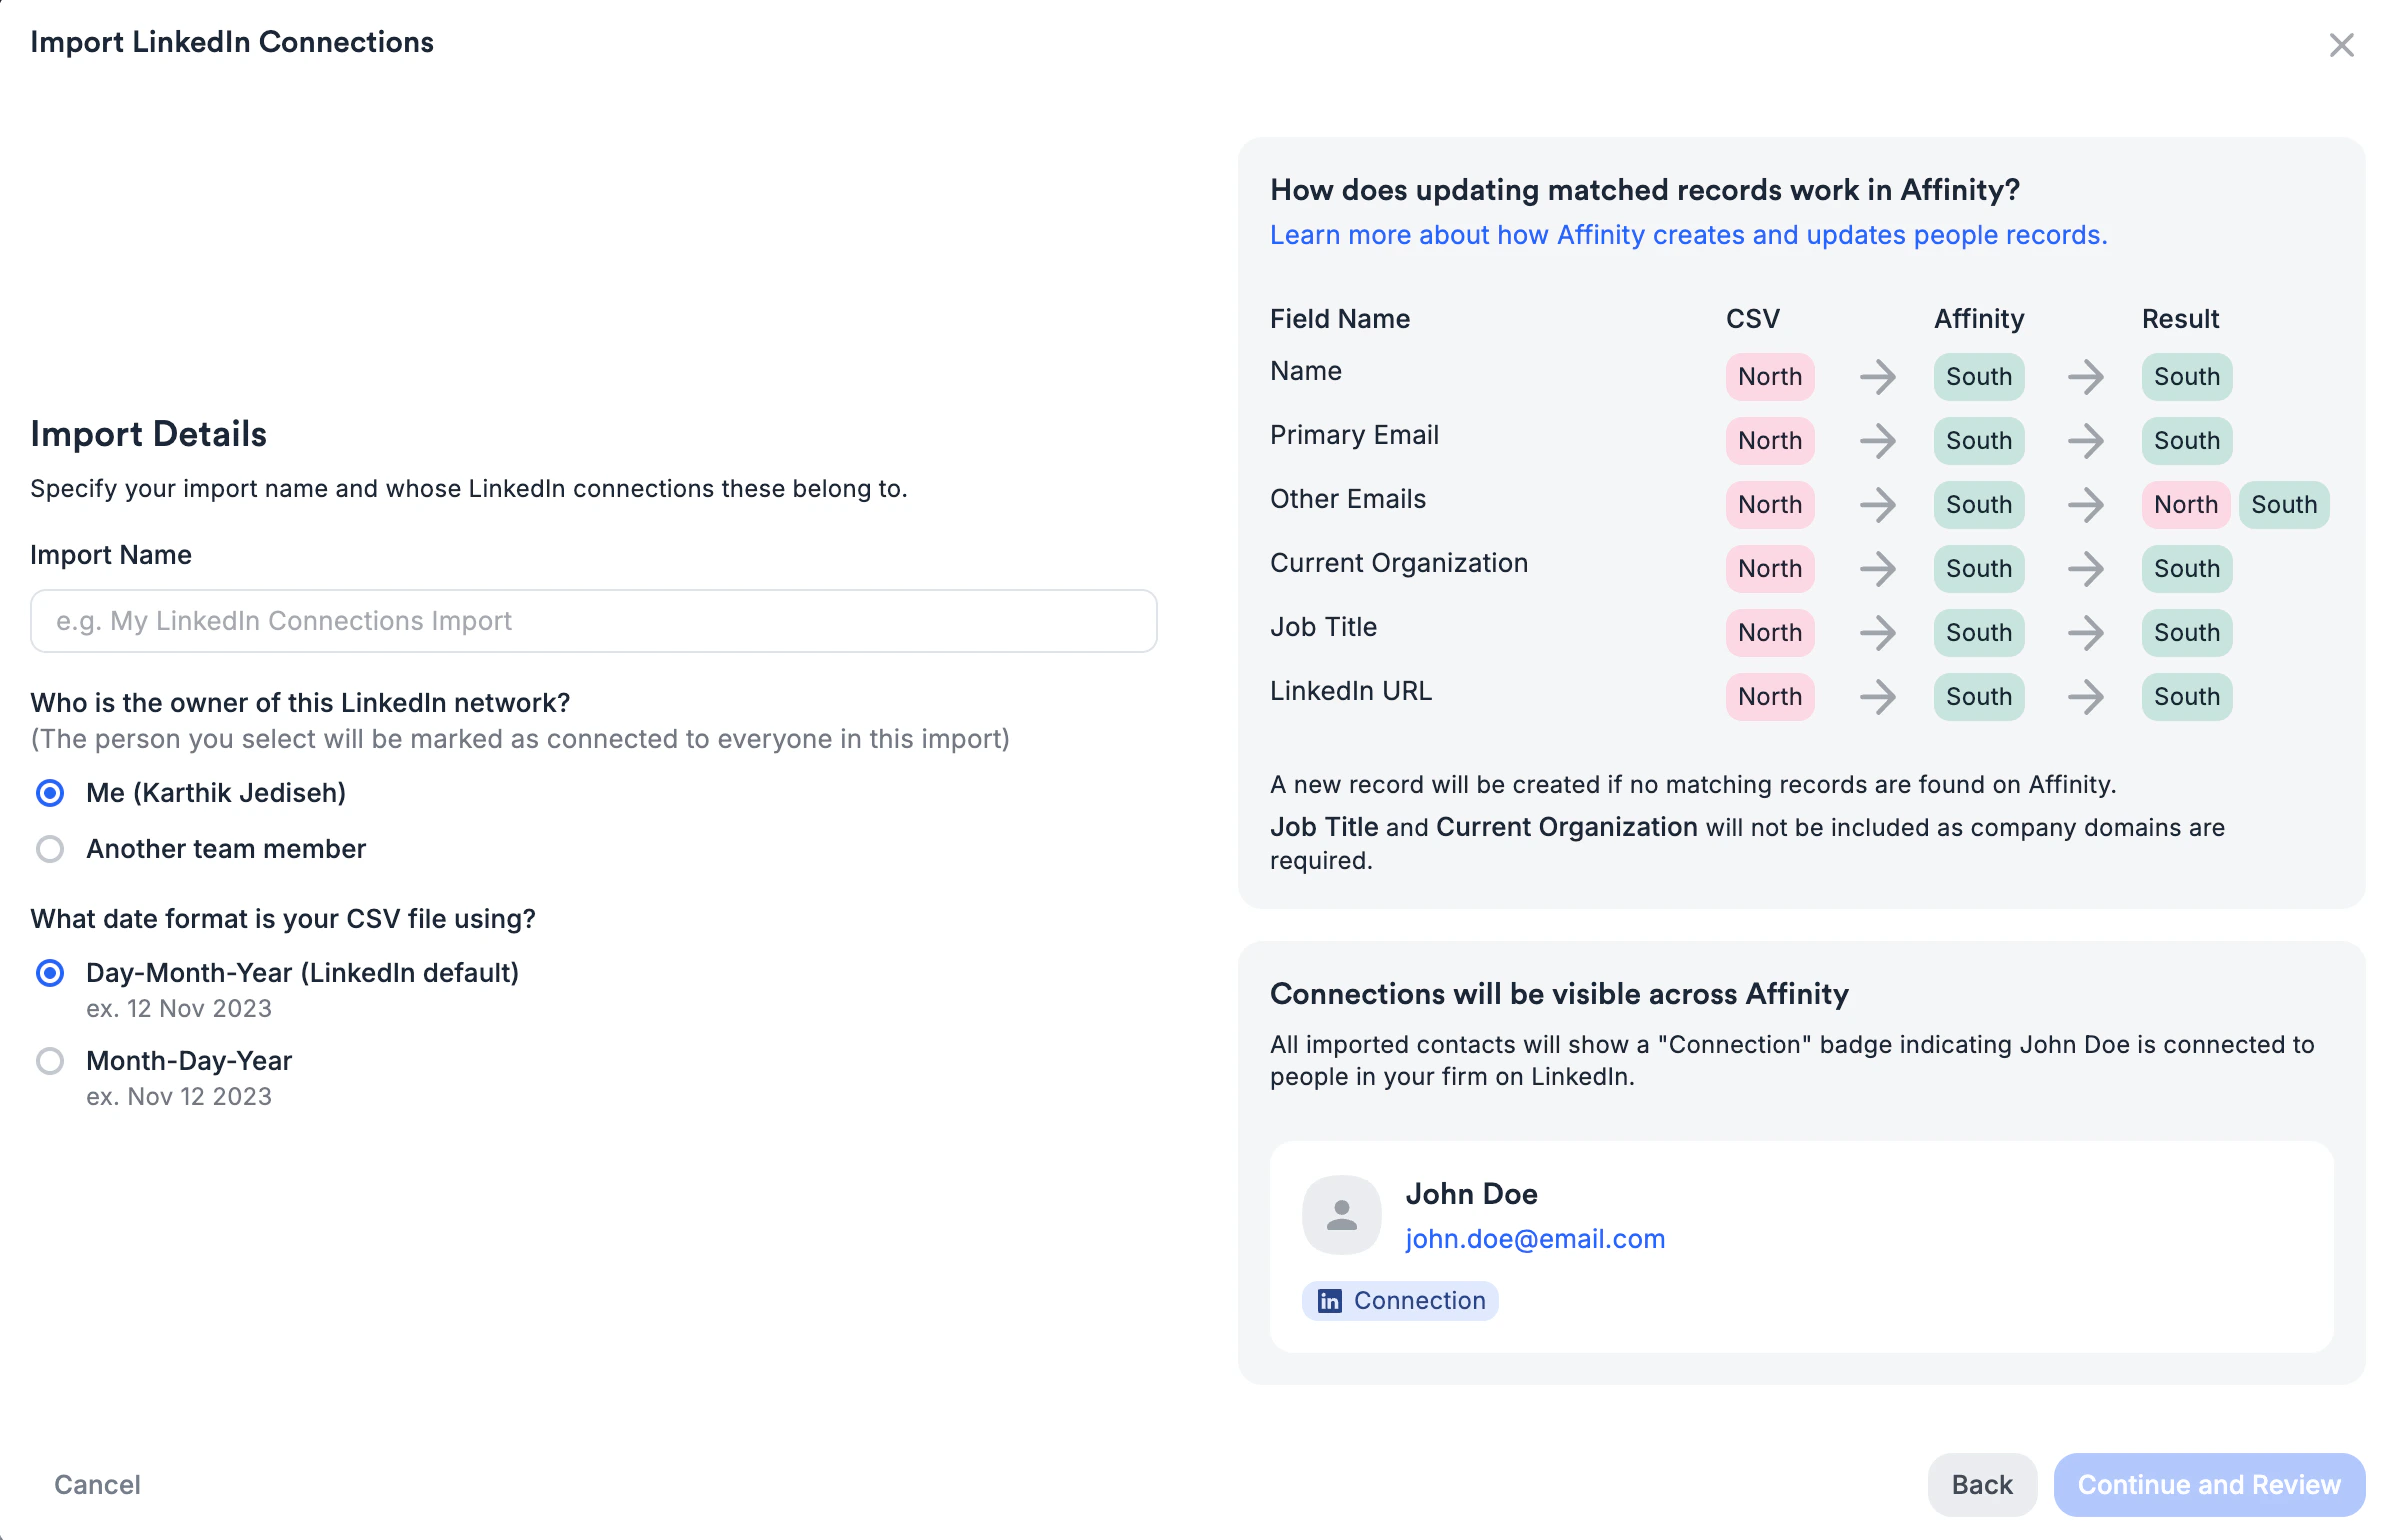
- Default: “LinkedIn Import - [Today’s Date]”
- Edit to something memorable if uploading multiple times
- Example: “LinkedIn Import - Q1 2026” or “Sarah Chen Connections”
- Character limit: 100 characters
- Select this if you’re uploading your own connections.
- Your LinkedIn network will be associated with your Affinity user profile.
- Select this if you’re uploading on behalf of a teammate.
- Choose the teammate from the dropdown.
- Their LinkedIn network will be associated with their Affinity user profile.
Step 4: Review Import Preview
The preview shows: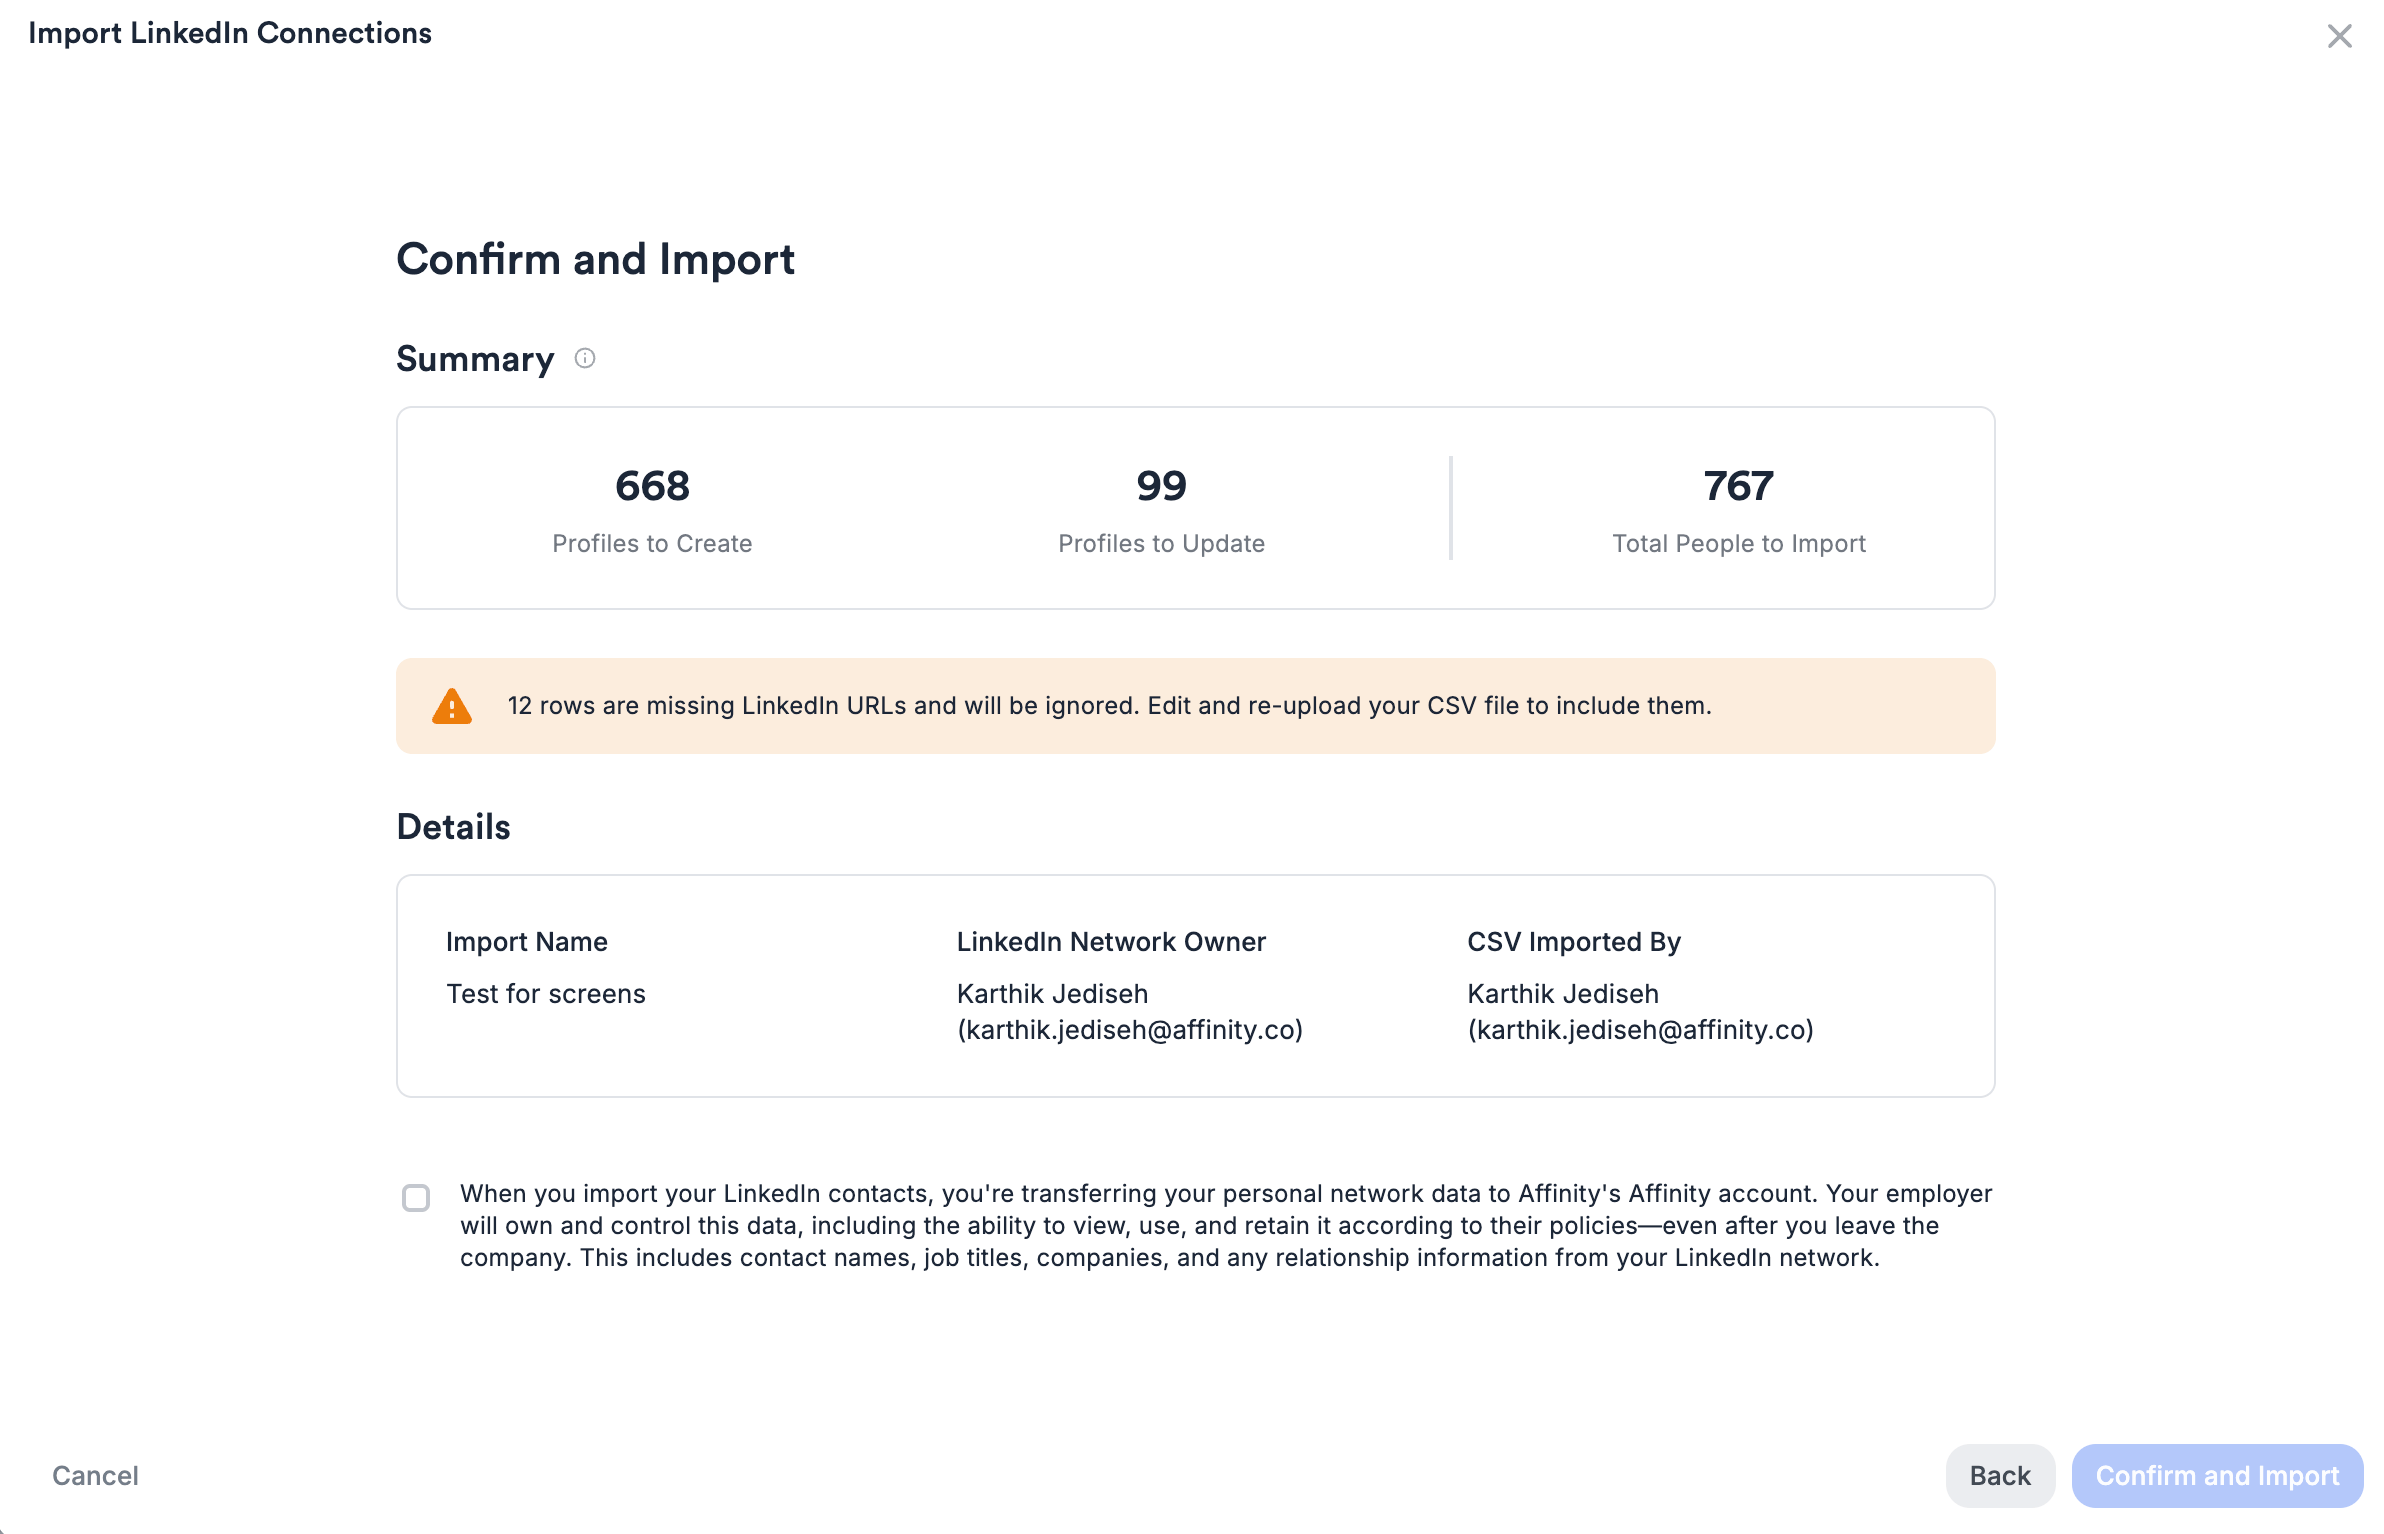
- New Profiles to Create: LinkedIn connections that don’t exist in Affinity yet
- Profiles to Update: Existing Affinity people who will get LinkedIn connection badges
- Total People to Import: Sum of new + updated
- LinkedIn connections are your PERSONAL data.
- Uploading transfers ownership to your company.
- Your employer will have access to this network data.
- Must acknowledge before proceeding.
Step 5: Confirm and Import
- Click Confirm and Import.
- File begins uploading (progress bar appears).
- You can now leave the page — upload continues in background (GA improvement).
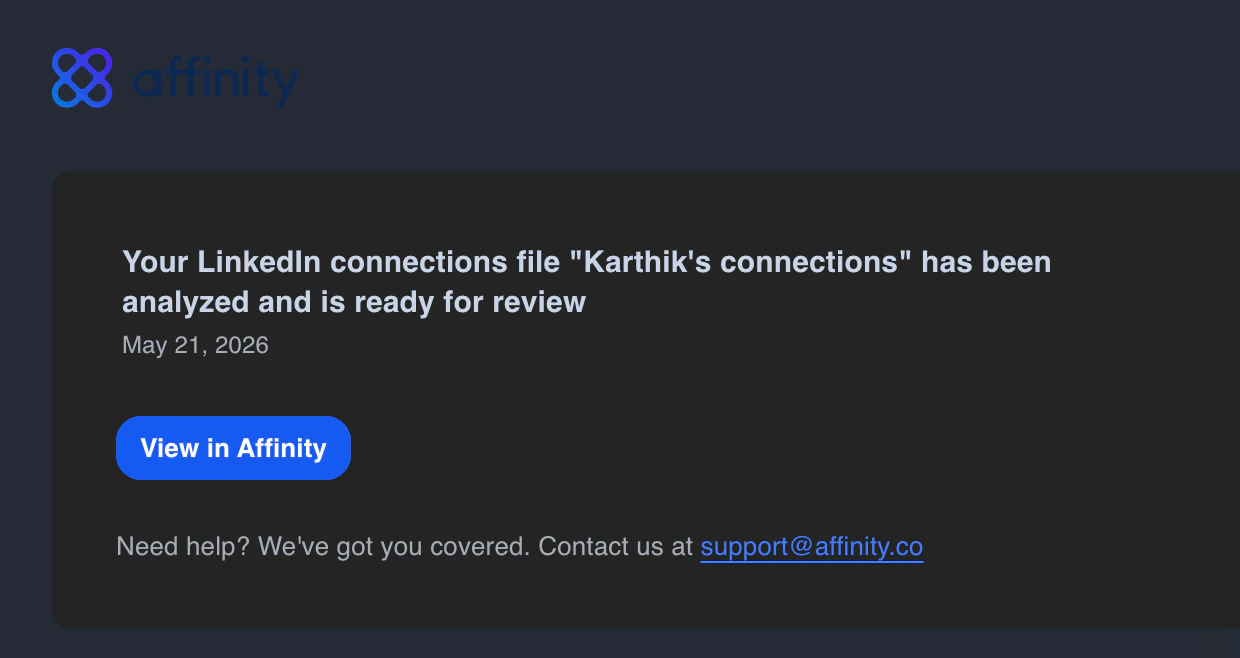
- Green notification: “Your CSV is uploading. We’ll notify you when ready to review.”
- You’ll receive a notification when upload completes and import is ready to confirm.
- Can leave page: Navigate away and return later to complete import.
- Large file support: Files with 3,000+ connections no longer timeout.
- Notification when ready: Check Affinity notifications for “Import ready to review”.
- Processing time:
- Small (less than 1,000 connections): ~2-5 minutes
- Medium (1,000-10,000): ~5-15 minutes
- Large (10,000-25,000): ~15-30 minutes
- Return to Settings > LinkedIn Data.
- Import shows in Upload History with status indicator.
- Review final preview if shown.
- Click final confirm (if required).
- Import completes and connections appear in Affinity.
Where Your LinkedIn Connections Appear
On Company Profiles (Profile → Connections Tab)
After importing, company profiles show: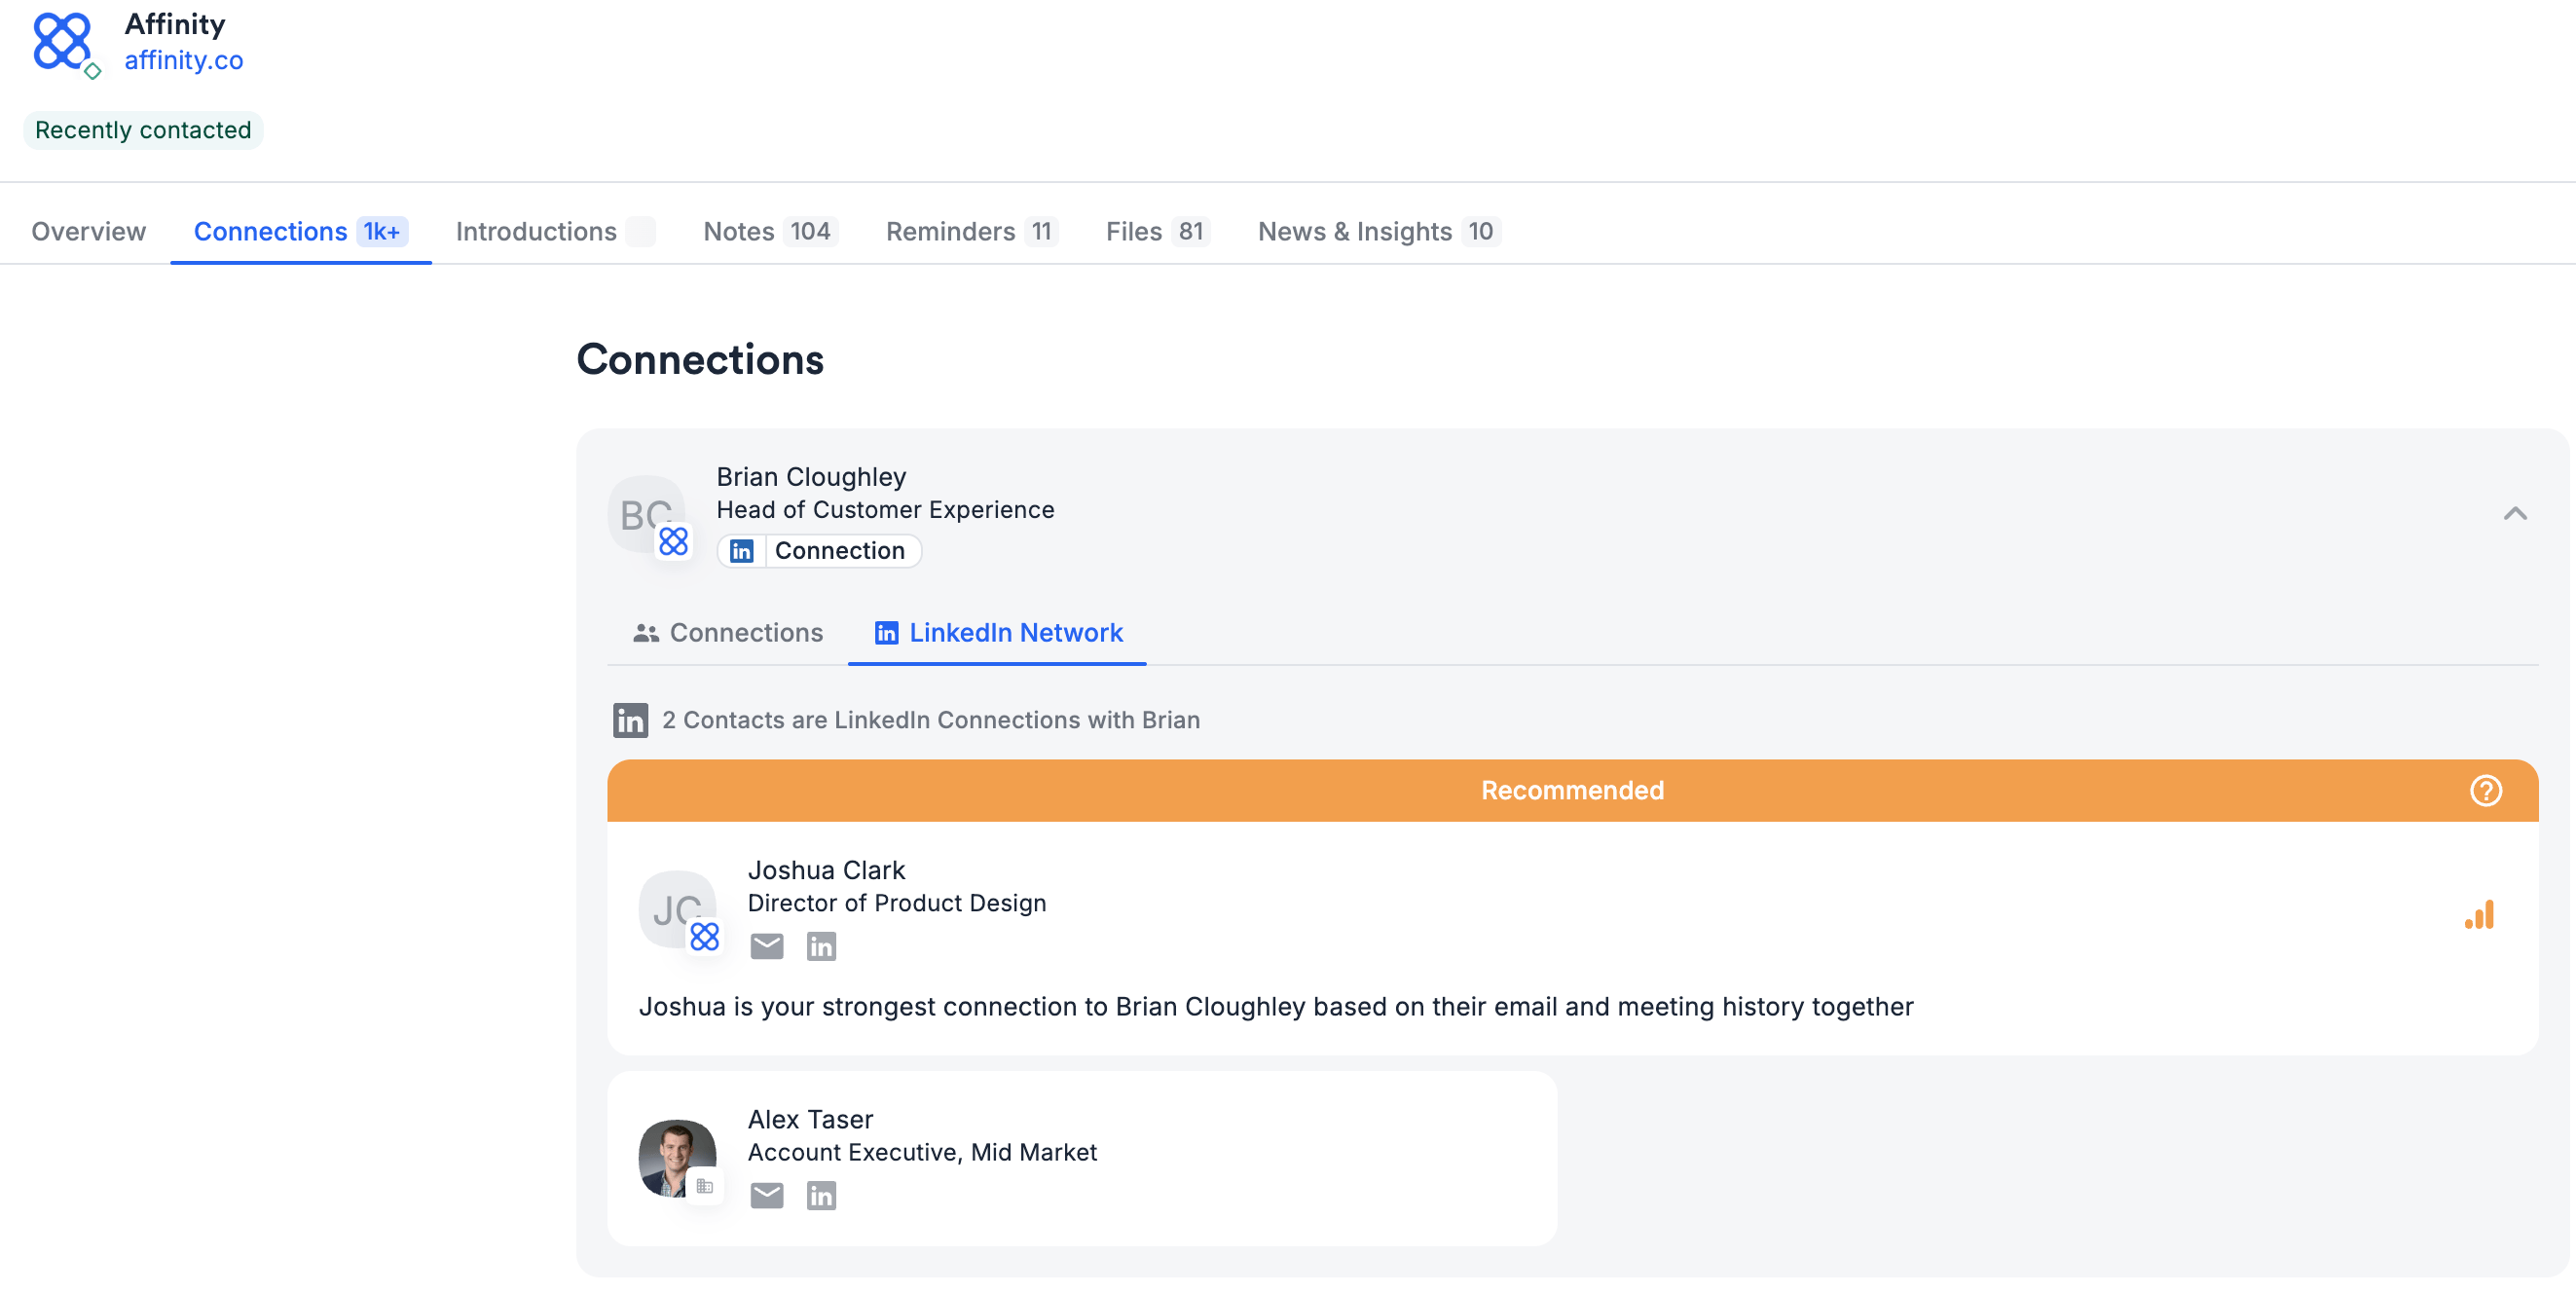
- Two-part LinkedIn badge: Icon + “Connection” text appears when ≥1 teammate is LinkedIn connected.
- No badge: Person may have LinkedIn profile, but no one at firm has imported connection to them.
- Click LinkedIn icon: Opens person’s LinkedIn profile in new tab.
- Hover over “Connection”: Tooltip shows the number of teammates at your firm that are connected.
- Click “Connection”: Expands to show LinkedIn Network tab with all connected teammates.
Connections → LinkedIn Network Tab (See Who’s Connected)
Click “Connection” on the LinkedIn badge to see WHO at your firm is connected to this person. How it works:- On any Company or Person profile, find connection cards with the LinkedIn badge.
- Click the “Connection” text (right side of badge).
- Connections Card expands to show LinkedIn Network tab.
- See list of ALL teammates who are LinkedIn connected to this person.
- Teammate names with their profile photos
- Their job titles at your firm
- When they imported their LinkedIn connections
- Direct link to view their Affinity profile
On Person Profiles

- Person profile header
- Click LinkedIn icon: Opens person’s LinkedIn profile in new tab.
- Hover over “Connection”: Tooltip shows the number of teammates at your firm that are connected.
- Person appears in All People directory.
- Shows on associated company profiles.
- LinkedIn badge visible.
Finding LinkedIn Connections on Lists
Filter Lists to show only companies or people with LinkedIn connections from your team. How to use:- Open any Company or People List.
- Click Filters (top right).
- Find “LinkedIn Connected To” filter.
- Select:
- Anyone on my team — Any teammate has a connection
- Me — Only your LinkedIn connections
- Specific teammate — Choose from dropdown
- Apply filter.
In Upload History (Settings > LinkedIn Data)
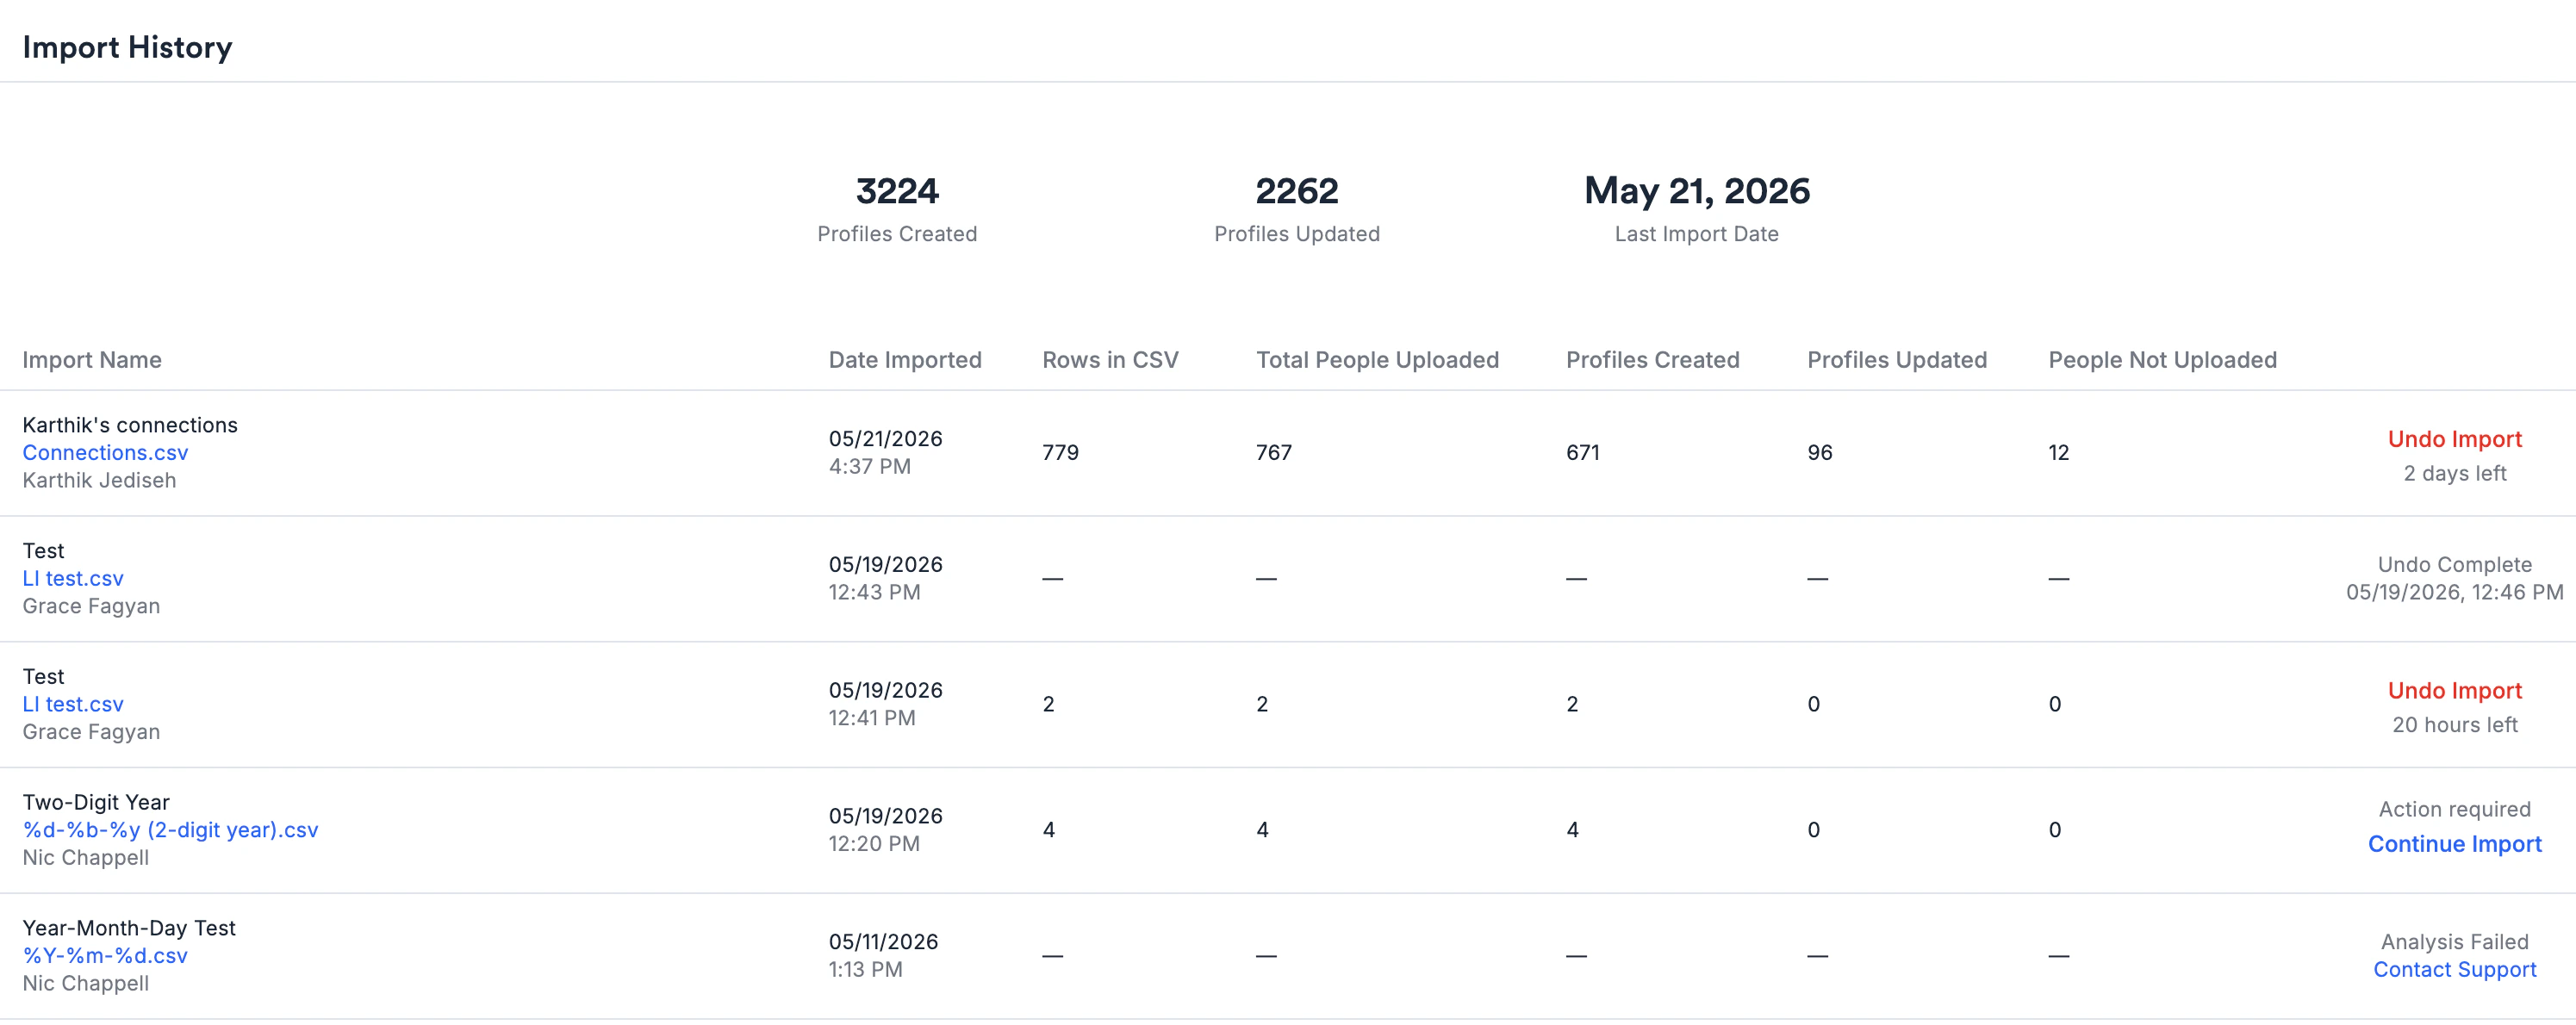
- Import Name: What you named it
- Date Imported: When import completed
- Rows in CSV: Total connections in your file
- Total People Uploaded: How many successfully imported
- Profiles Created: New people added to Affinity
- Profiles Updated: Existing people who got LinkedIn badges
- People not Uploaded: Connections that were skipped (invalid data)
- Download CSV: Click the import filename (blue link) in history table to download your original file
- Continue Import: Resume an import where you skipped the final Confirm step
- Undo Import: Available for 2 days (see section below)
- Person who uploaded the CSV
- Person whose connections they are (owner)
- Admins (Enterprise Admin and Admin roles can view ALL imports across the account) — GA improvement
- Monitor org-wide LinkedIn data coverage
- Troubleshoot import issues for any user
- Audit network data completeness across the firm
Managing Your Imports
Viewing Upload History
Location: Settings > LinkedIn Data > Upload HistoryContinuing your Import
- Once you initiate an import and review the suggested connections, you may choose to skip the Confirm and Import step (the final step in the Import process).
- This changes the state to “Continue Import” in the Import History entry for your import.
- Clicking on it brings up the final dialog to Confirm and Import.
Undoing an Import
Within 2 days of import:- Go to Settings > LinkedIn Data > Upload History.
- Find the import you want to undo.
- Click Undo Import.
- Review what will be undone.
- Click Confirm.
- New person profiles created from import are deleted (including all their data).
- Updates to existing profiles are reverted (LinkedIn badges removed, additional emails removed).
- Enriched companies remain in All Organizations directory (won’t be deleted).
- Company-person associations may remain.
- Undo button no longer available.
- Contact Affinity Support at support@affinity.co to request undo.
- Provide: Import name, date, and reason for undo.
Re-Uploading Updated Connections
LinkedIn connections aren’t automatically synced. To keep Affinity updated:- Periodically download fresh Connections CSV from LinkedIn.
- Upload to Affinity using same process.
- Affinity’s matching prevents duplicates:
- Existing matches → Updates with any new data
- New connections → Creates new people
- No duplicates for same connections
- Quarterly for most teams
- Monthly if your network grows rapidly
- After major conferences or networking events
Frequently Asked Questions
How often should I upload my LinkedIn connections? Quarterly is typical for most teams. Upload more frequently (monthly) if your network grows rapidly or after major networking events. LinkedIn connections don’t automatically sync — you must manually re-download and re-upload for updates. Can I upload connections for my entire team at once? No. Each person’s connections must be uploaded separately (one CSV per person). However, anyone can upload on behalf of a colleague by selecting “My Colleague’s LinkedIn Connections” and choosing the owner during import. Will this create duplicate people in Affinity? Possibly. If your LinkedIn CSV has connections with only names (no email or LinkedIn URL), the system creates new records rather than risk incorrect merges. You can manually merge duplicates after import using Affinity’s duplicate merge tool. What if my CSV is larger than 10MB? Split the CSV into multiple files and upload separately. Affinity’s matching logic prevents duplicates across uploads — the same connection uploaded twice won’t create duplicates. Why don’t new LinkedIn connections have email addresses? By design. Email fields are hidden for new people created from LinkedIn-only data (no prior firm email interaction) to prevent LinkedIn ToS violations. Once someone at your firm emails that person, the email field becomes visible. Do LinkedIn connections get relationship strength scores? No. New people created from LinkedIn import don’t receive relationship scores because scores are based on interaction data (emails, meetings). Just knowing someone on LinkedIn doesn’t indicate relationship strength. Existing people who get LinkedIn badges keep their existing scores. Can teammates see my LinkedIn connections after I upload? Yes. After you upload, LinkedIn connection badges become visible to everyone at your firm on company/person profiles. Upload history is only visible to you and the connection owner, but the resulting network data is firm-wide. Can I undo an import? Yes, within 2 days. Go to Settings > LinkedIn Data > Upload History, find the import, click Undo Import. After 2 days, contact Support. What happens when I re-upload connections? Affinity updates existing matched records and creates new ones for new connections. Re-uploading the same connections won’t create duplicates — matching prevents this.Troubleshooting
Upload Failed or Stuck
Symptoms: Error message during upload, or import stuck in “Processing” for more than 2 hours. Try:- Verify file is less than 10MB and CSV format.
- Confirm it’s LinkedIn Connections export (not Messages or other data).
- Re-download fresh CSV from LinkedIn.
- Try uploading again.
- If persists, contact Support with import name and error details.
Fewer Connections Imported Than Expected
Symptoms: “People not Uploaded” count is high relative to total CSV rows. Common causes:- Invalid CSV data (malformed rows)
- Missing required fields (name)
- Duplicate rows in same CSV
- Download original CSV from Upload History.
- Open in Excel/Sheets and review skipped rows.
- Look for:
- Blank name fields
- Strange characters or encoding issues
- Duplicate entries
- Clean CSV and re-upload if needed.
Created Unwanted Duplicates
Symptoms: Same person appears multiple times in All People directory. Why this happens:- CSV had name-only data (no email or LinkedIn URL).
- Low-confidence match → System created new record (safer than incorrect merge).
- Use Affinity’s duplicate merge tool to consolidate.
- OR undo import (if within 2 days) and clean CSV before re-uploading.
Date Format Upload Failure
Symptoms: Upload fails with date-related error message. Why this happens:- Selected wrong date format during upload.
- LinkedIn CSV uses different format than selected.
- Open your
Connections.csvin Excel or Google Sheets. - Check “Connected On” column to see actual date format.
- Examples: 03/15/2024 (MM/DD/YYYY), 15/03/2024 (DD/MM/YYYY)
- Retry upload and select the matching format from dropdown.
- If still fails, contact Support with your CSV format details.
LinkedIn Badges Not Appearing
Symptoms: Uploaded connections but don’t see blue badges on company profiles. Check:- Verify import completed (check email confirmation).
- Review Upload History — confirm “New Records” or “Records Enhanced” > 0.
- Refresh the company profile page.
- Check specific person profiles for LinkedIn badges.
- If still not visible after 30 minutes, contact Support.
Privacy and Data Ownership Considerations
What You’re Sharing
When you upload LinkedIn connections: You’re transferring your PERSONAL LinkedIn network data to your employer’s Affinity account:- Names of all your LinkedIn connections
- Their job titles and companies
- Their email addresses (if available)
- Their LinkedIn profile URLs
- Visibility into who you know professionally
- Ability to leverage your network for business purposes
- Ownership and control of this data
- This makes your personal network a business asset.
- You cannot retroactively make connections “private” after uploading.
- Undo within 2 days if you change your mind.
Data Ownership
After upload:- Your employer owns the LinkedIn connection data.
- Data persists even if you leave the company.
- Firm can use your network data for deal flow, introductions, sourcing.
- Are you comfortable sharing your full LinkedIn network with your employer?
- Do you have connections you’d prefer to keep private?
- Is there a firm policy on LinkedIn data uploads?
- Discuss with your manager before uploading.
- Review company policies on personal data.
- Consider which connections are appropriate to share.