How-to — task-oriented recipe.
- Example: If Test Company (testcompany.com) wants to add John Doe “john@testcompany.com” as a sync only or limited seat, the owner/IT team of testcompany.com will need to access their domain name server.
Part 1 - Find your DNS records
- Sign into the account for your domain registrar’s website - this is usually the place where you bought your domain or where you host your website.
- Not sure where it is or cannot access it? Please contact your IT team and/or the domain registrar’s support team.
- Find the page on your domain registrar’s site where you manage the domains you own.
- Select the domain you’re setting up today and look for the place where you manage DNS records. This page might be called one of the following options:
- DNS settings or DNS management
- Advanced settings
- Name server management
- Control panel
- If you have trouble finding your DNS records, please contact your domain registrar’s support team.
Part 2 - Add affinity-allowed-subdomains
- Make sure you know your Affinity CRM subdomain (see How to find your Affinity subdomain) - it will be in the following format:
https://[subdomain].affinity.co - Using the example above regarding Test Company, it could look like:
https://testcompany.affinity.co/ - In this case, the Affinity subdomain would be “testcompany”
- Now, go to the website where you’re hosting your domain and create a new TXT record.
- Then, look for the Name field - it could be named something else such as: Host, Hostname, or Alias.
- Many registrars want you to enter @ in this field.
- Some might want you to enter your domain name or a subdomain.
- Contact your registrar if you need help with this.
- Then, look for the Value field - it could be named something else such as: Data, Answer, or Destination. Replace the right hand side with the appropriate value based on how many subdomains you have.
- If you only have access to one Affinity CRM account, you would only have one subdomain and it would look like the following based on the example in Steps 1-3 above:
affinity-allowed-subdomains=testcompany - If you have access to two or more Affinity CRM accounts (e.g. one for production and another for sandbox), you would have two or more subdomains and it would look like the following:
affinity-allowed-subdomains=testcompany,testcompany-sandbox
- If you only have access to one Affinity CRM account, you would only have one subdomain and it would look like the following based on the example in Steps 1-3 above:
- Once you’re done adding the affinity-allowed-subdomains, please refer back to the relevant article based on your Affinity subscription:
- Affinity CRM (Sync Only Seats): How to invite/manage Sync Only users in Affinity
- Affinity for Salesforce (Limited Seats): How to set up Affinity for Salesforce
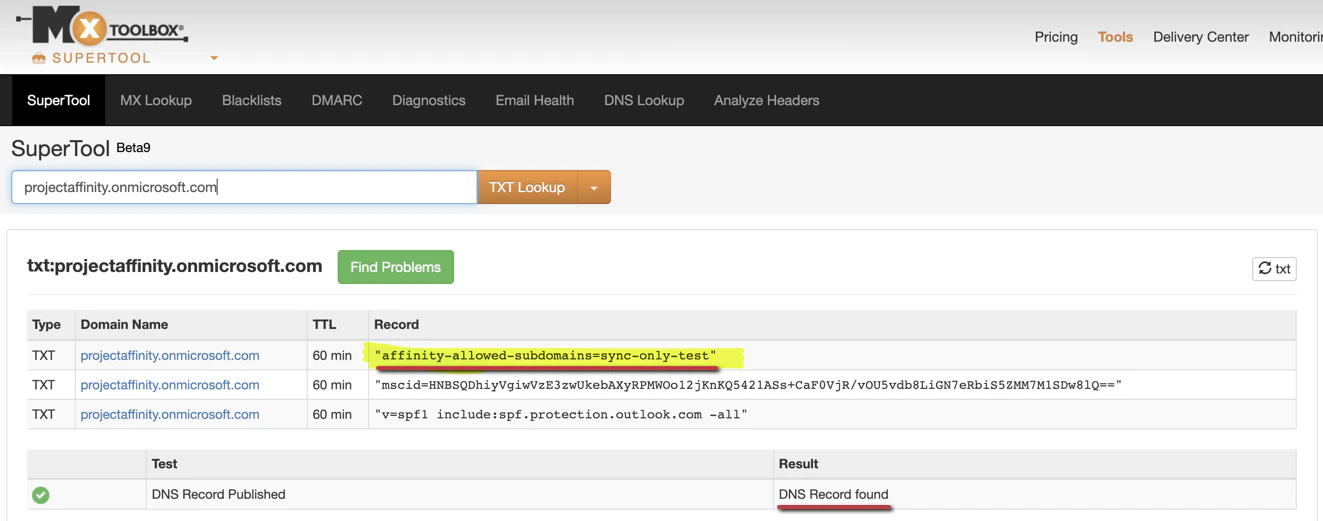
Part 3 - Verify the addition of affinity-allowed-subdomains
- Go to the MxToolBox website to look up the affinity-allowed-subdomains and verify that they have been successfully added. Make sure to select the TXT Lookup option as you search for your organization’s domain.

- If you’ve set up your organization’s domain correctly, you should see it appear as a TXT record. Please note that your subdomain will be different from the one shown in the example below:
sync-only-test