> ## Documentation Index
> Fetch the complete documentation index at: https://support.affinity.co/llms.txt
> Use this file to discover all available pages before exploring further.
# How To Use Affinity's Email Bot
> Help center reference
**How-to** — task-oriented recipe.
With Affinity's Email Bot, you can take two core Affinity actions from your inbox using two bots:
1. **Note Bot**: Attach notes to people, organizations, and opportunities.
2. **List-Specific Bot**: Add a person, organization, or opportunity to a list.
Please note that we have extensions and mobile apps to minimize the need for the Email Bot:
* For Gmail users on a laptop/desktop, you can use the [Affinity Pathfinder Chrome Extension](/s/article/Affinity-CRM-and-Affinity-Alliances-How-to-use-Affinity-s-Pathfinder-Chrome-Extension).
* For Outlook users on a laptop/desktop, you can use [Affinity's Outlook Add-in](/s/article/Affinity-CRM-How-to-use-Affinity-s-Outlook-Add-in).
* When you're on-the-go, you can use the [Affinity mobile app](/s/article/Android-users-How-to-use-the-Affinity-Mobile-App).
## How to find the Email Bot
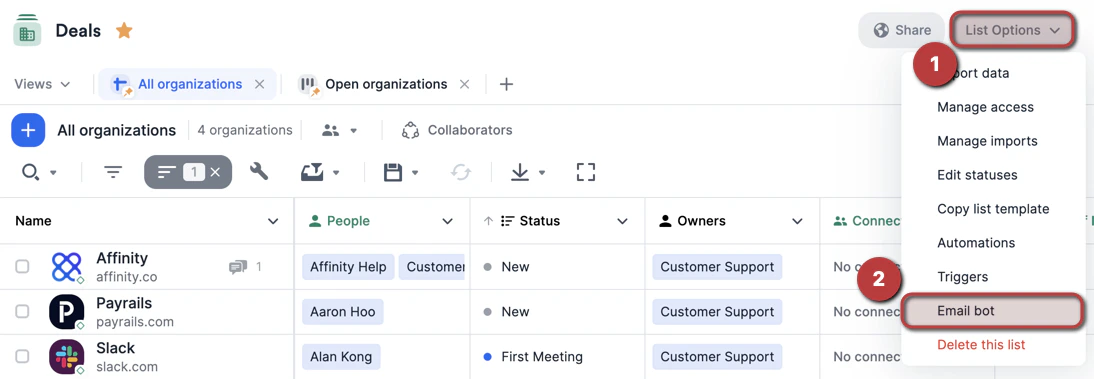
1. Click **List Options** on the top-right corner, then click **Email bot**.
 **Note**: Users who have disabled emails from syncing into Affinity will **not** be able to use the Email Bot.
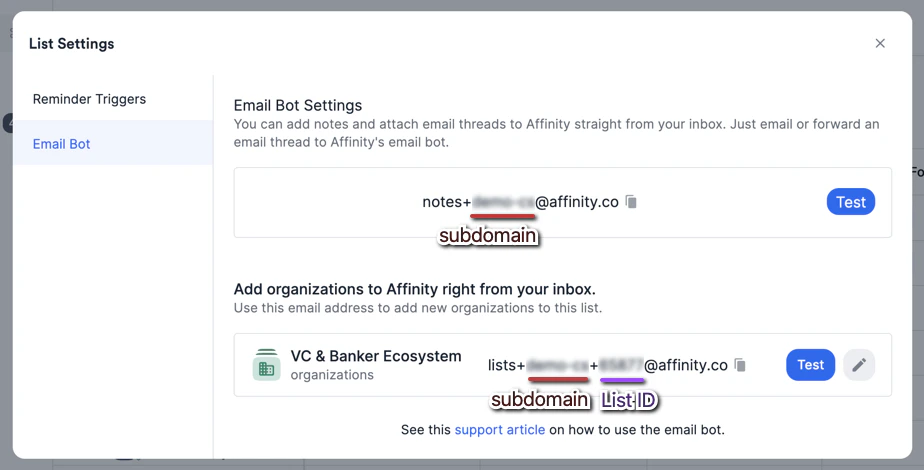
2. You will see two email addresses: the **Note Bot Email Address** and the **List-Specific Bot Email Address**. You can copy/paste either to the "To" or "CC" lines in your email draft based on whether you'd like to add a note to an entity or add an entity to the given list.
**Note**: Users who have disabled emails from syncing into Affinity will **not** be able to use the Email Bot.
2. You will see two email addresses: the **Note Bot Email Address** and the **List-Specific Bot Email Address**. You can copy/paste either to the "To" or "CC" lines in your email draft based on whether you'd like to add a note to an entity or add an entity to the given list.
 **Note**: Adding either of the email addresses to the "BCC" line will **not** work.
## How to use the Note Bot
1. Use the **Note Bot Email Address**. The format would look like the following:
```text theme={null}
notes+[subdomain]@affinity.co
```
2. The **subject** line can include a relevant title for the note.
3. The **first** line of the email should consist of one of the three:
* **Organization URL** of the organization you wish to attach a note to.
* **Email Address** of the person you wish to attach a note to.
* **Opportunity Name** of the opportunity you wish to attach a note to.
4. Skip the **second** line and leave it blank (see below).
5. The **third** line will contain the note you wish to attach to the contact.
6. Be sure to include a line break between the object (line 1) and the note (line 2). It will take approximately **15-20 minutes** for the new note to attach to the contact's profile page.
**Note**: Adding either of the email addresses to the "BCC" line will **not** work.
## How to use the Note Bot
1. Use the **Note Bot Email Address**. The format would look like the following:
```text theme={null}
notes+[subdomain]@affinity.co
```
2. The **subject** line can include a relevant title for the note.
3. The **first** line of the email should consist of one of the three:
* **Organization URL** of the organization you wish to attach a note to.
* **Email Address** of the person you wish to attach a note to.
* **Opportunity Name** of the opportunity you wish to attach a note to.
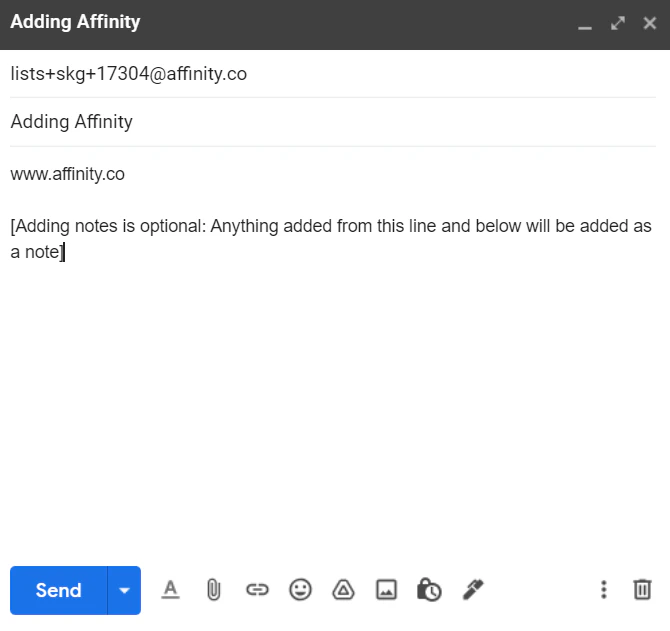
4. Skip the **second** line and leave it blank (see below).
5. The **third** line will contain the note you wish to attach to the contact.
6. Be sure to include a line break between the object (line 1) and the note (line 2). It will take approximately **15-20 minutes** for the new note to attach to the contact's profile page.
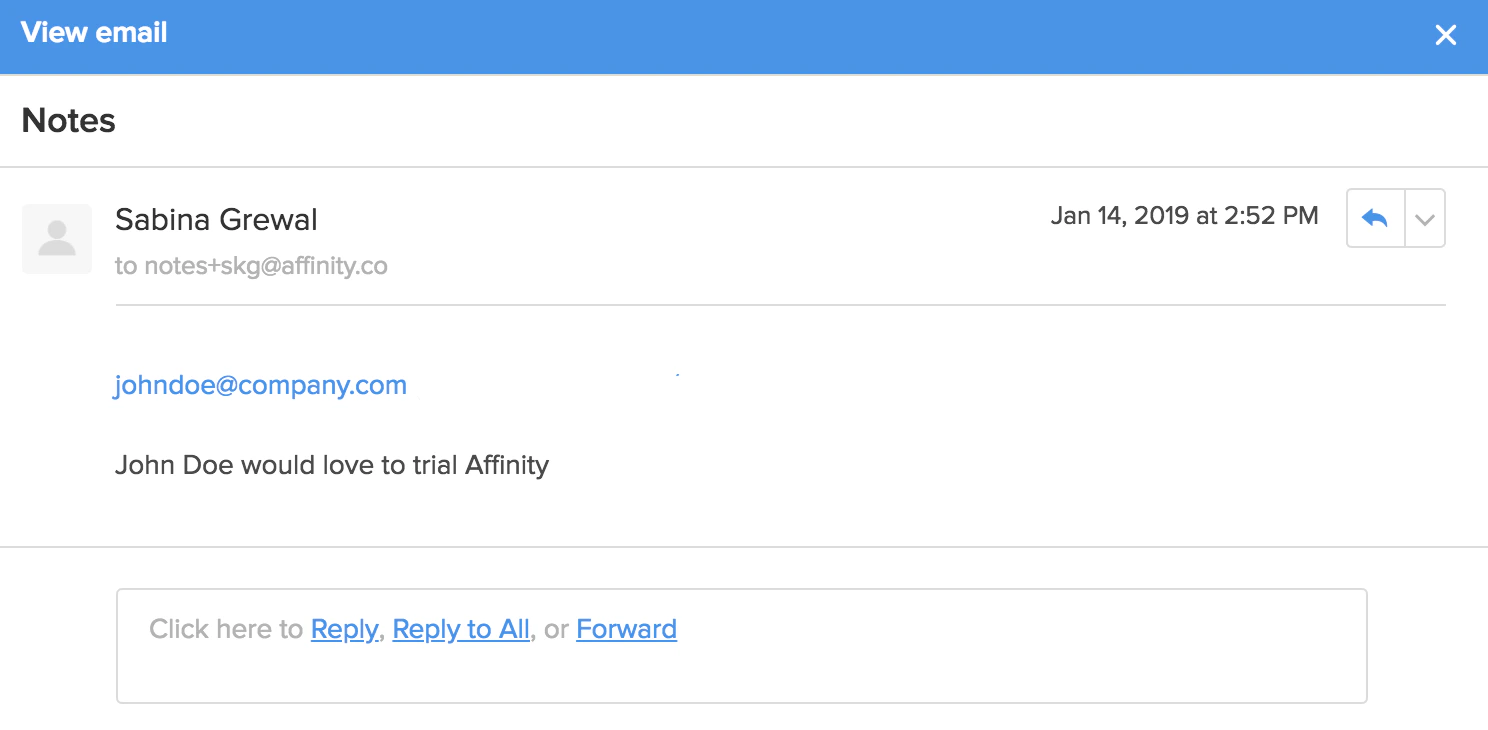
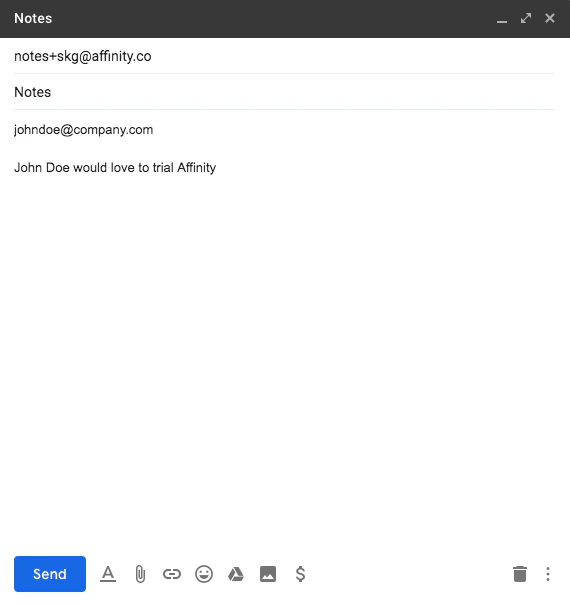 7. Below is an example of how the attached note would look like.
 ## How to use the List-Specific Bot
1. Use the **List-Specific Bot Email Address**. The format would look like the following:
```text theme={null}
lists+[subdomain]+[list ID]@affinity.co
```
2. The **subject** line can include a relevant title for the note.
3. The **first** line of the email should consist of one of the three:
1. **Organization URL** of the organization you wish to add to an **organization** list.
2. **Email Address** of the person you wish to add to a **people** list.
3. **Opportunity Name** of the opportunity you wish to add to an **opportunity** list.
4. Skip the **second** line and leave it blank (see below).
5. The **third** line will contain the note you wish to attach to the new list entry (not available for opportunities).
6. Be sure to include a line break between the object (line 1) and the note (line 2). It will take approximately **15-20 minutes** before the new note appears in Affinity.
**Note:** When adding contacts to lists using the **List-Specific Bot**, please be aware that if you add an **organization URL** to a **People** list (or an **email address** to an **Organization** list), the Email Bot will fail.
## How to use the List-Specific Bot
1. Use the **List-Specific Bot Email Address**. The format would look like the following:
```text theme={null}
lists+[subdomain]+[list ID]@affinity.co
```
2. The **subject** line can include a relevant title for the note.
3. The **first** line of the email should consist of one of the three:
1. **Organization URL** of the organization you wish to add to an **organization** list.
2. **Email Address** of the person you wish to add to a **people** list.
3. **Opportunity Name** of the opportunity you wish to add to an **opportunity** list.
4. Skip the **second** line and leave it blank (see below).
5. The **third** line will contain the note you wish to attach to the new list entry (not available for opportunities).
6. Be sure to include a line break between the object (line 1) and the note (line 2). It will take approximately **15-20 minutes** before the new note appears in Affinity.
**Note:** When adding contacts to lists using the **List-Specific Bot**, please be aware that if you add an **organization URL** to a **People** list (or an **email address** to an **Organization** list), the Email Bot will fail.
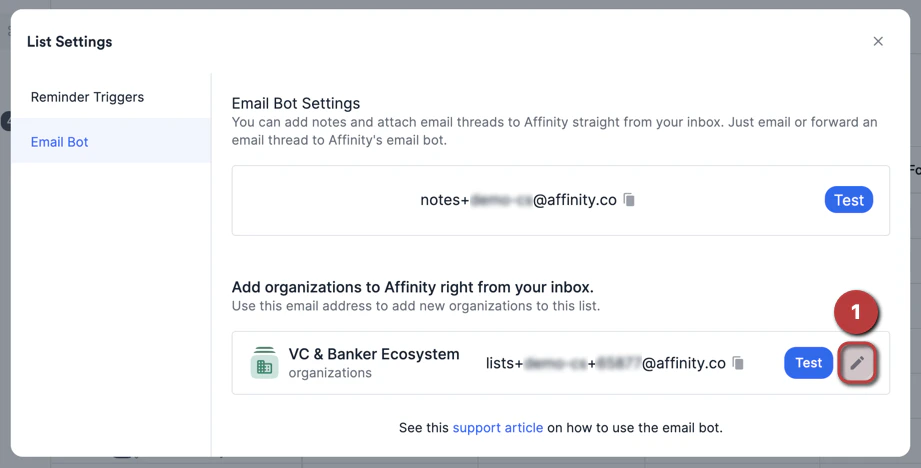
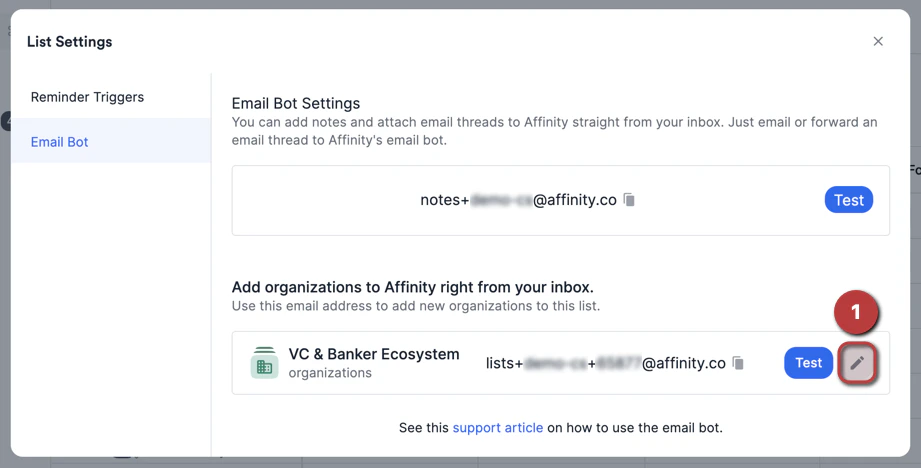
 7. If it's easier to identify which List-Specific Bot belongs to which list, you can click the **Edit** icon to rename the List ID to the relevant List Name.
 ## Important Callouts
* Please be aware that the **list ID** is different for each list, so be mindful of which **List-Specific Bot** you select when drafting up an email.
* If it's easier to identify which List-Specific Bot belongs to which list, you can click the **Edit** icon to rename the List ID to the relevant List Name.
## Important Callouts
* Please be aware that the **list ID** is different for each list, so be mindful of which **List-Specific Bot** you select when drafting up an email.
* If it's easier to identify which List-Specific Bot belongs to which list, you can click the **Edit** icon to rename the List ID to the relevant List Name.
 * Notes can only be sent to a profile that already exists within Affinity. The Email Bot will not create a profile if one doesn't already exist.
* Adding new contacts to a list via the Email Bot will **not** work — you can only add existing contacts in your [All People directory](/s/article/All-people-and-all-organizations) to a list via the Email Bot.
* The **Note Bot Email Address** and the **List-Specific Bot Email Address** can only be on the "To" or "CC" lines. If they are on the "BCC" line, it will not work.
* Only Affinity users with access to the CRM may leverage the Email Bot.
* You must be syncing with Affinity to use the Email Bot (check your [Email Accounts](/s/article/How-to-reenable-syncing-into-Affinity) tab to see if syncing is disabled, then reenable syncing if needed).
* Adding entries to an Opportunity type list will require a unique name each time you wish to add a new entry.
* If there was a name and/or subdomain change for your Affinity instance:
* (i.e. `[oldsubdomain].affinity.co` → `[newsubdomain].affinity.co`)
* Make sure to check the email addresses of the **Note Bot** and the **List-Specific Bot** that you're sending emails to, they will have been updated to the new subdomain.
* Notes can only be sent to a profile that already exists within Affinity. The Email Bot will not create a profile if one doesn't already exist.
* Adding new contacts to a list via the Email Bot will **not** work — you can only add existing contacts in your [All People directory](/s/article/All-people-and-all-organizations) to a list via the Email Bot.
* The **Note Bot Email Address** and the **List-Specific Bot Email Address** can only be on the "To" or "CC" lines. If they are on the "BCC" line, it will not work.
* Only Affinity users with access to the CRM may leverage the Email Bot.
* You must be syncing with Affinity to use the Email Bot (check your [Email Accounts](/s/article/How-to-reenable-syncing-into-Affinity) tab to see if syncing is disabled, then reenable syncing if needed).
* Adding entries to an Opportunity type list will require a unique name each time you wish to add a new entry.
* If there was a name and/or subdomain change for your Affinity instance:
* (i.e. `[oldsubdomain].affinity.co` → `[newsubdomain].affinity.co`)
* Make sure to check the email addresses of the **Note Bot** and the **List-Specific Bot** that you're sending emails to, they will have been updated to the new subdomain.