> ## Documentation Index
> Fetch the complete documentation index at: https://support.affinity.co/llms.txt
> Use this file to discover all available pages before exploring further.
# How To Integrate Affinity With Microsoft SharePoint
> How To Integrate Affinity With Microsoft SharePoint
Automate and expedite your workflows by integrating Affinity with Microsoft SharePoint.
* **Note**: This is a **uni-directional** sync from Affinity to Microsoft SharePoint. It will only upload already-uploaded files from Affinity to a designated folder on Microsoft Sharepoint, not the other way around.
**Important Update (February 2026)**: Microsoft is upgrading SharePoint APIs, which requires changes to how you authenticate this integration. See the "Authentication Update" section below for details.
1. Once you've checked the prerequisites (check out the section titled "Prerequisites" within this article: [Getting started with native integrations in Affinity](https://affinity2ndorg.lightning.force.com/articles/Knowledge/Getting-started-with-native-integrations-in-Affinity)) and enabled proper access to Microsoft SharePoint, click **Settings** on the left side of your screen.
2. Click on the **Integrations** tab, then click on **Microsoft SharePoint**.
## New Authentication Setup (For integrations created after February 26, 2026)
Before configuring the integration in Affinity, you'll need to set up an App registration in Microsoft Azure:
### Step 1: Create App Registration in Azure
1. Log in to the Microsoft Azure Portal
2. Navigate to **Azure Active Directory** > **App registrations**
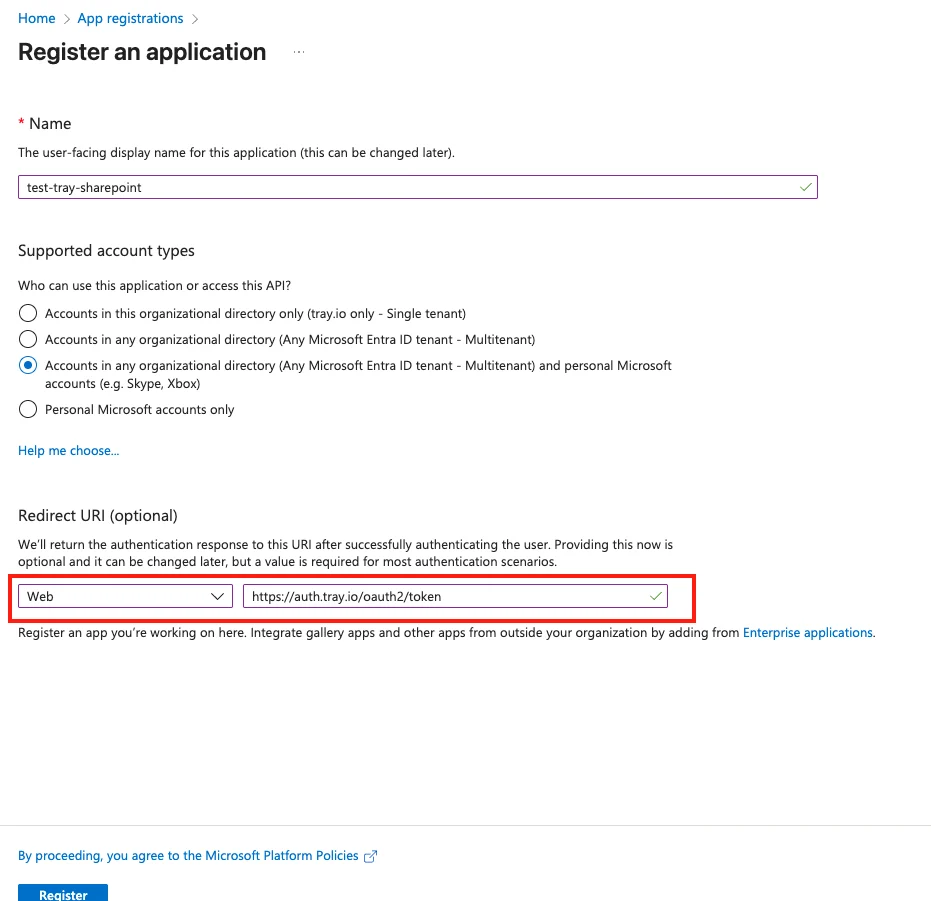
3. Click **New registration**
4. Provide the following information:
* **Name**: Affinity SharePoint Integration (or your preferred name)
* **Supported account types**: Select appropriate option for your organization
* **Redirect URI**: Web: [https://auth.tray.io/oauth2/token](https://auth.tray.io/oauth2/token)
5. Click **Register**
 ### Step 2: Configure API Permissions
1. In your new App registration, navigate to **API permissions**
2. Click **Add a permission**
3. Select **Microsoft Graph** > **Delegated permissions**
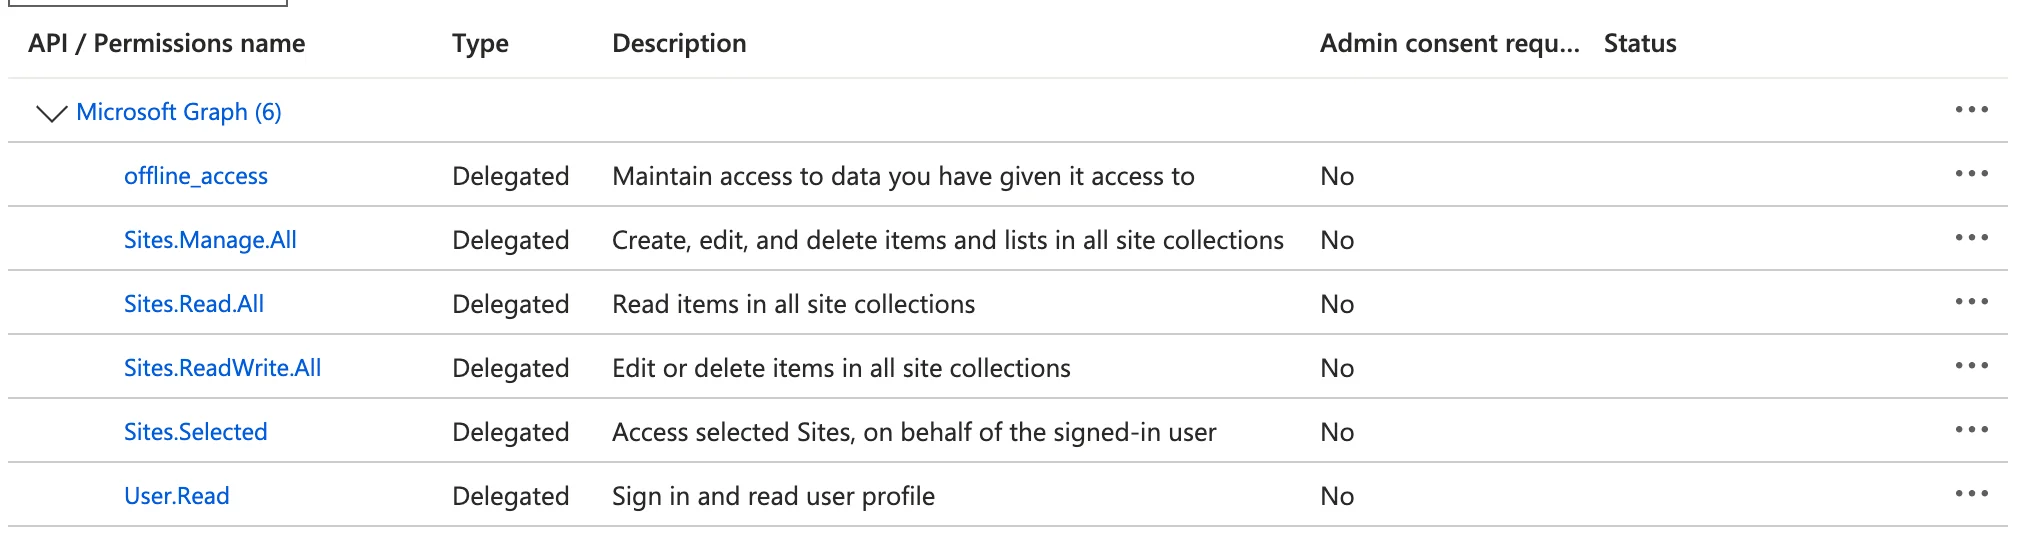
4. Add the following permissions:
* offline\_access
* Sites.Manage.All
* [Sites.Read](http://Sites.Read).All
* Sites.ReadWrite.All
* Sites.Selected`Files.ReadWrite.All`
* [User.Read](http://User.Read)
### Step 2: Configure API Permissions
1. In your new App registration, navigate to **API permissions**
2. Click **Add a permission**
3. Select **Microsoft Graph** > **Delegated permissions**
4. Add the following permissions:
* offline\_access
* Sites.Manage.All
* [Sites.Read](http://Sites.Read).All
* Sites.ReadWrite.All
* Sites.Selected`Files.ReadWrite.All`
* [User.Read](http://User.Read)
 ### Step 3: Create Client Secret
1. Navigate to **Certificates & secrets**
2. Click **New client secret**
3. Add a description and select an expiration period. The integration will stop working after the expiration period. Choose a timeline accordingly!
4. Click **Add**
### Step 3: Create Client Secret
1. Navigate to **Certificates & secrets**
2. Click **New client secret**
3. Add a description and select an expiration period. The integration will stop working after the expiration period. Choose a timeline accordingly!
4. Click **Add**
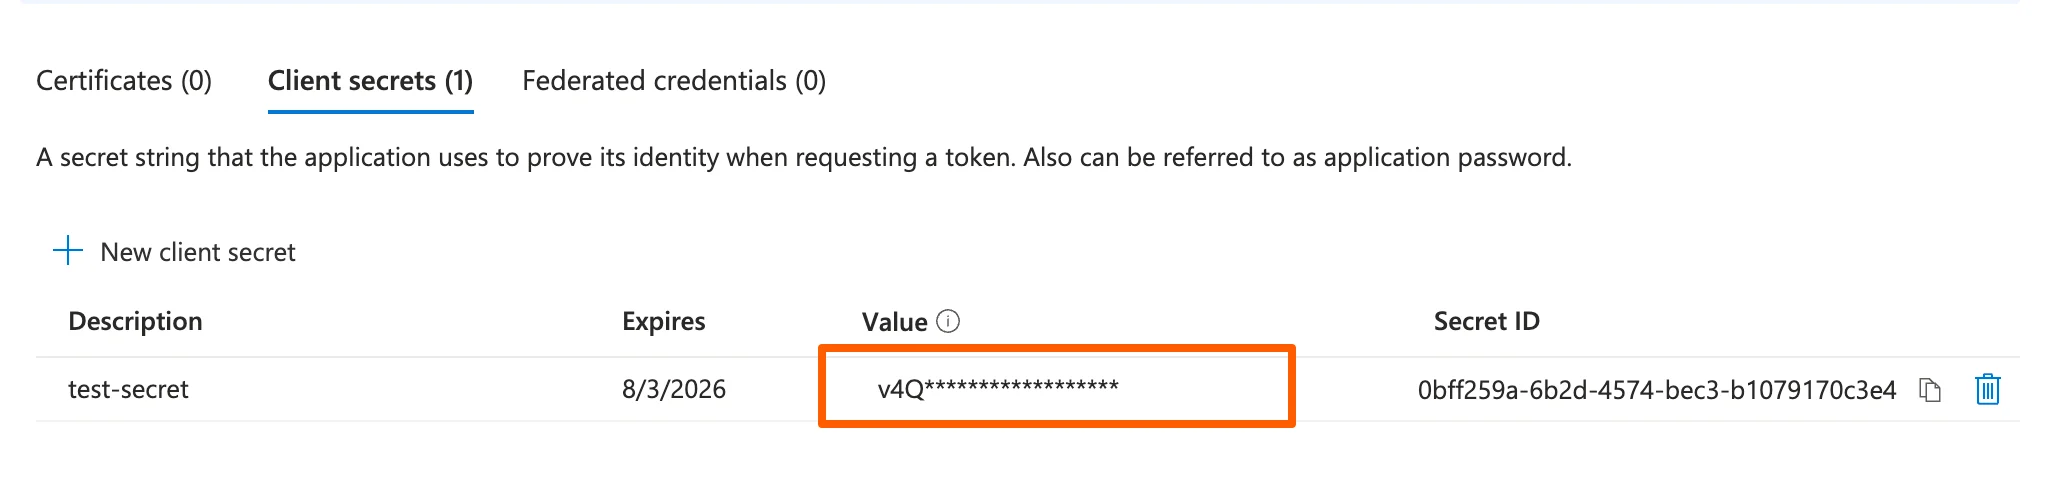 **Important**: Copy the client secret **VALUE** immediately (NOT the Secret ID itself) - you won't be able to see it again
### Step 4: Collect Required Values
You'll need three values from Azure to complete the Affinity integration:
* **Tenant ID**: Found in the App registration Overview page
* **Client ID**: Found in the App registration Overview page
* **Client Secret**: The value you copied in Step 3
For detailed instructions, refer to Tray's documentation: [https://docs.tray.ai/connectors/service/sharepoint#version-5-0](https://docs.tray.ai/connectors/service/sharepoint#version-5-0)
## **Affinity Files to SharePoint Folders**
For all list entries within a specific Affinity list, the files that have been uploaded to these list entries' profile pages will also sync to their own auto-created folders within a designated folder in your Microsoft SharePoint account.
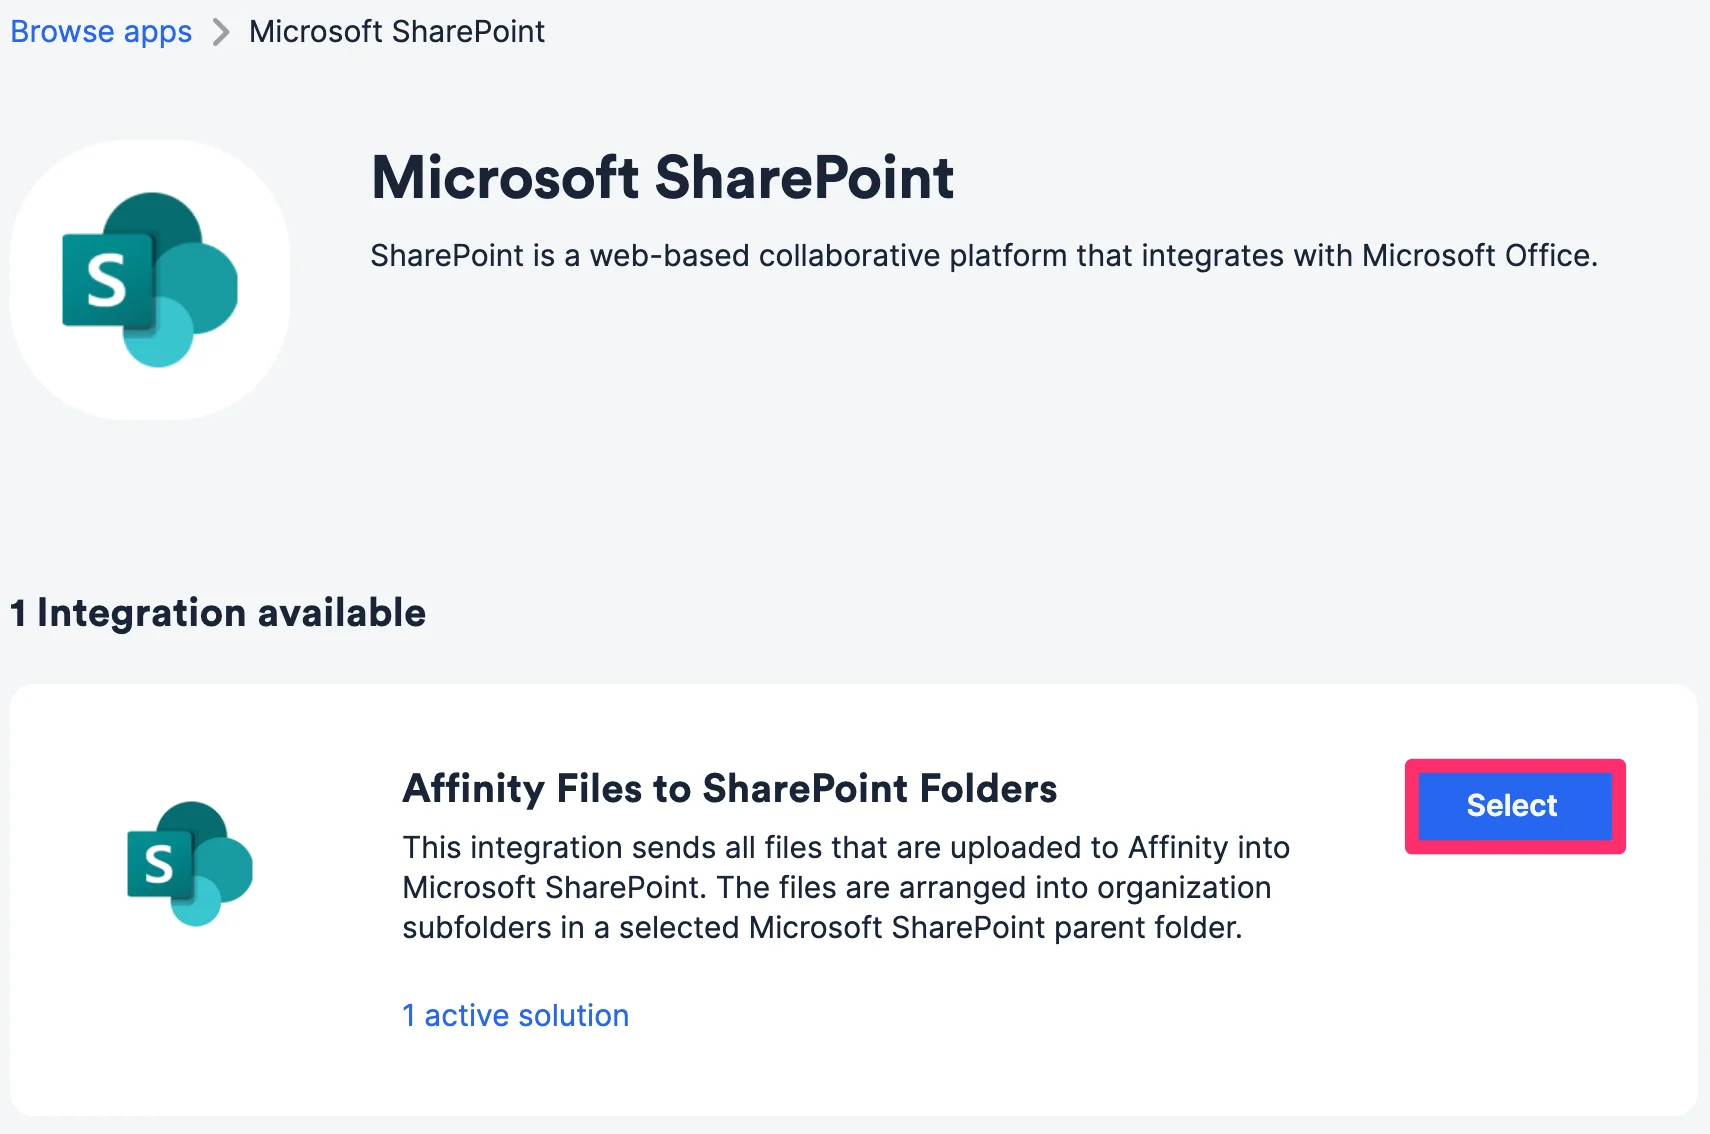
1. Within the **Affinity Files to SharePoint Folders** integration, click **Select**.
**Important**: Copy the client secret **VALUE** immediately (NOT the Secret ID itself) - you won't be able to see it again
### Step 4: Collect Required Values
You'll need three values from Azure to complete the Affinity integration:
* **Tenant ID**: Found in the App registration Overview page
* **Client ID**: Found in the App registration Overview page
* **Client Secret**: The value you copied in Step 3
For detailed instructions, refer to Tray's documentation: [https://docs.tray.ai/connectors/service/sharepoint#version-5-0](https://docs.tray.ai/connectors/service/sharepoint#version-5-0)
## **Affinity Files to SharePoint Folders**
For all list entries within a specific Affinity list, the files that have been uploaded to these list entries' profile pages will also sync to their own auto-created folders within a designated folder in your Microsoft SharePoint account.
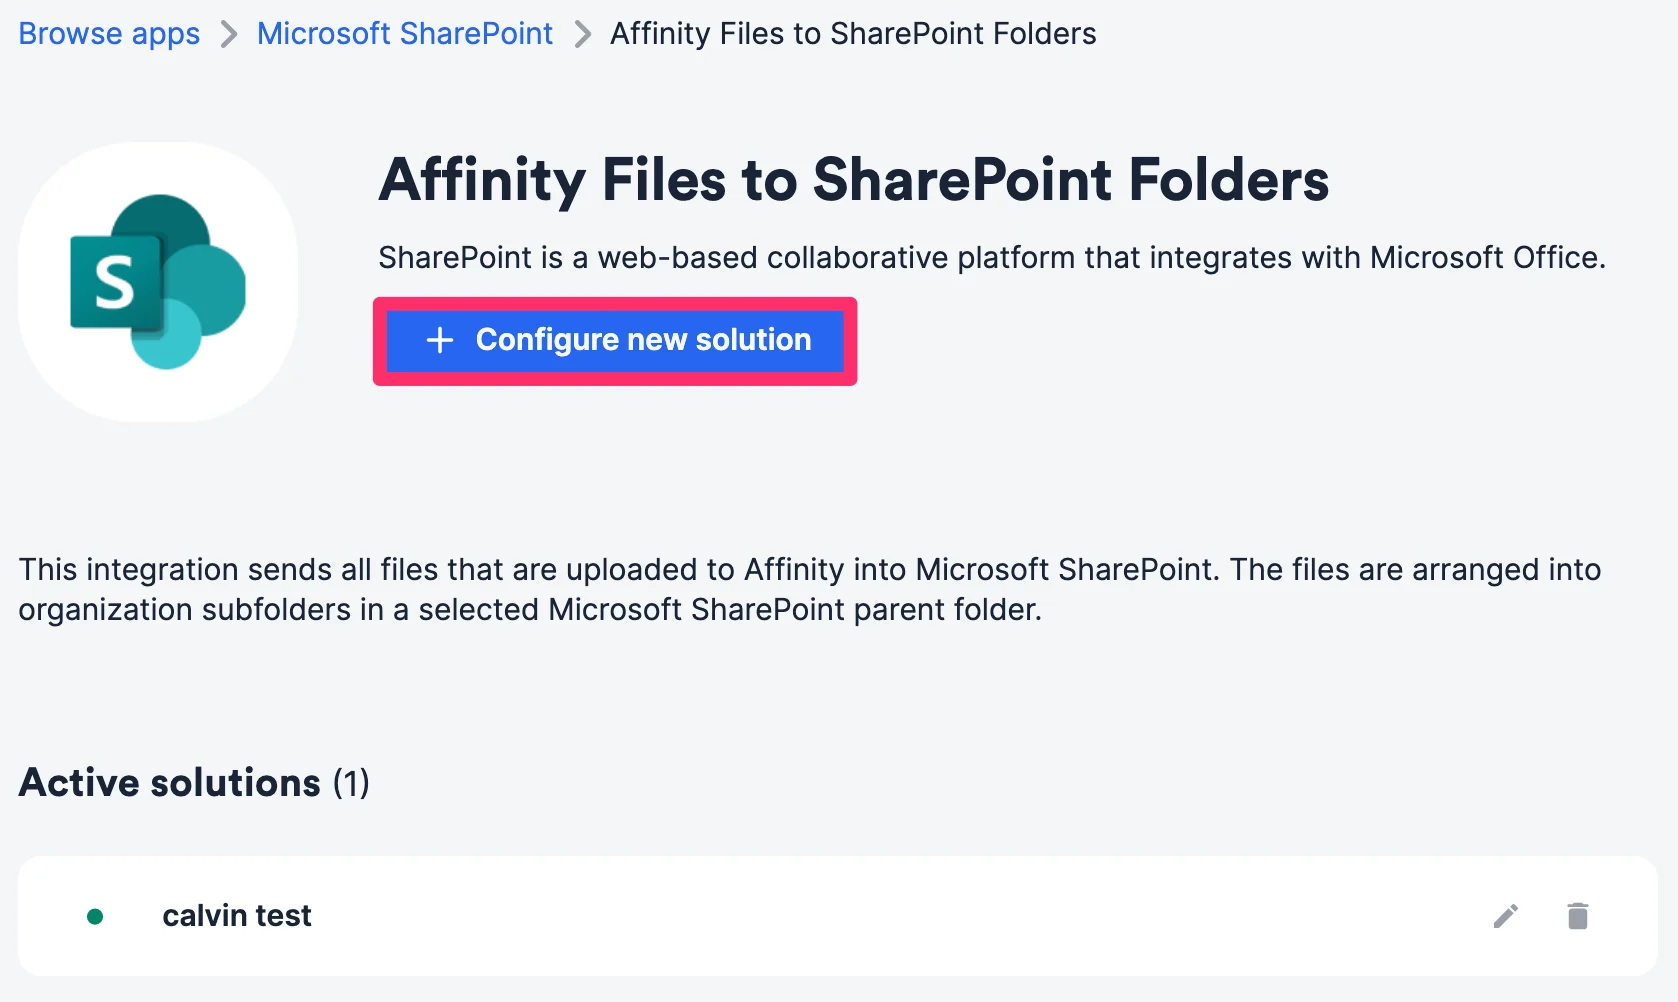
1. Within the **Affinity Files to SharePoint Folders** integration, click **Select**.
 2. Click **Configure new solution**.
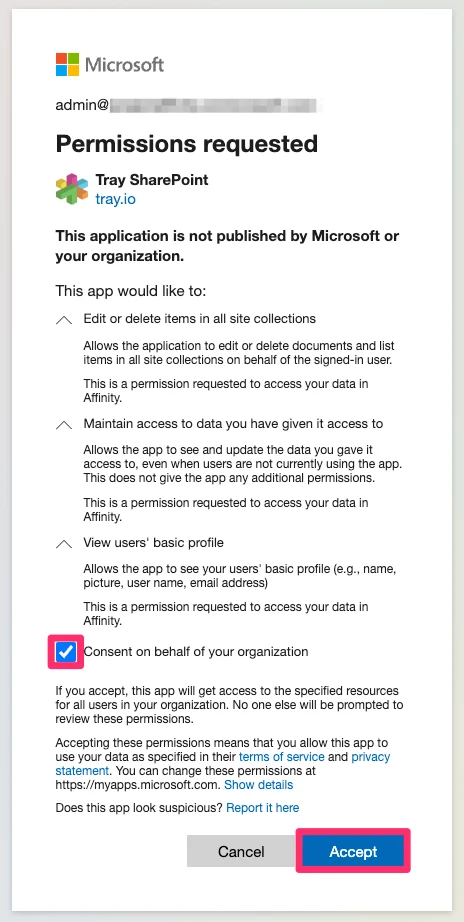
 3. You will find a modal regarding Tray SharePoint ([tray.io](http://tray.io)) asking for permissions. Click the checkbox to approve "Consent on behalf of your organization" and click **Accept** to continue.
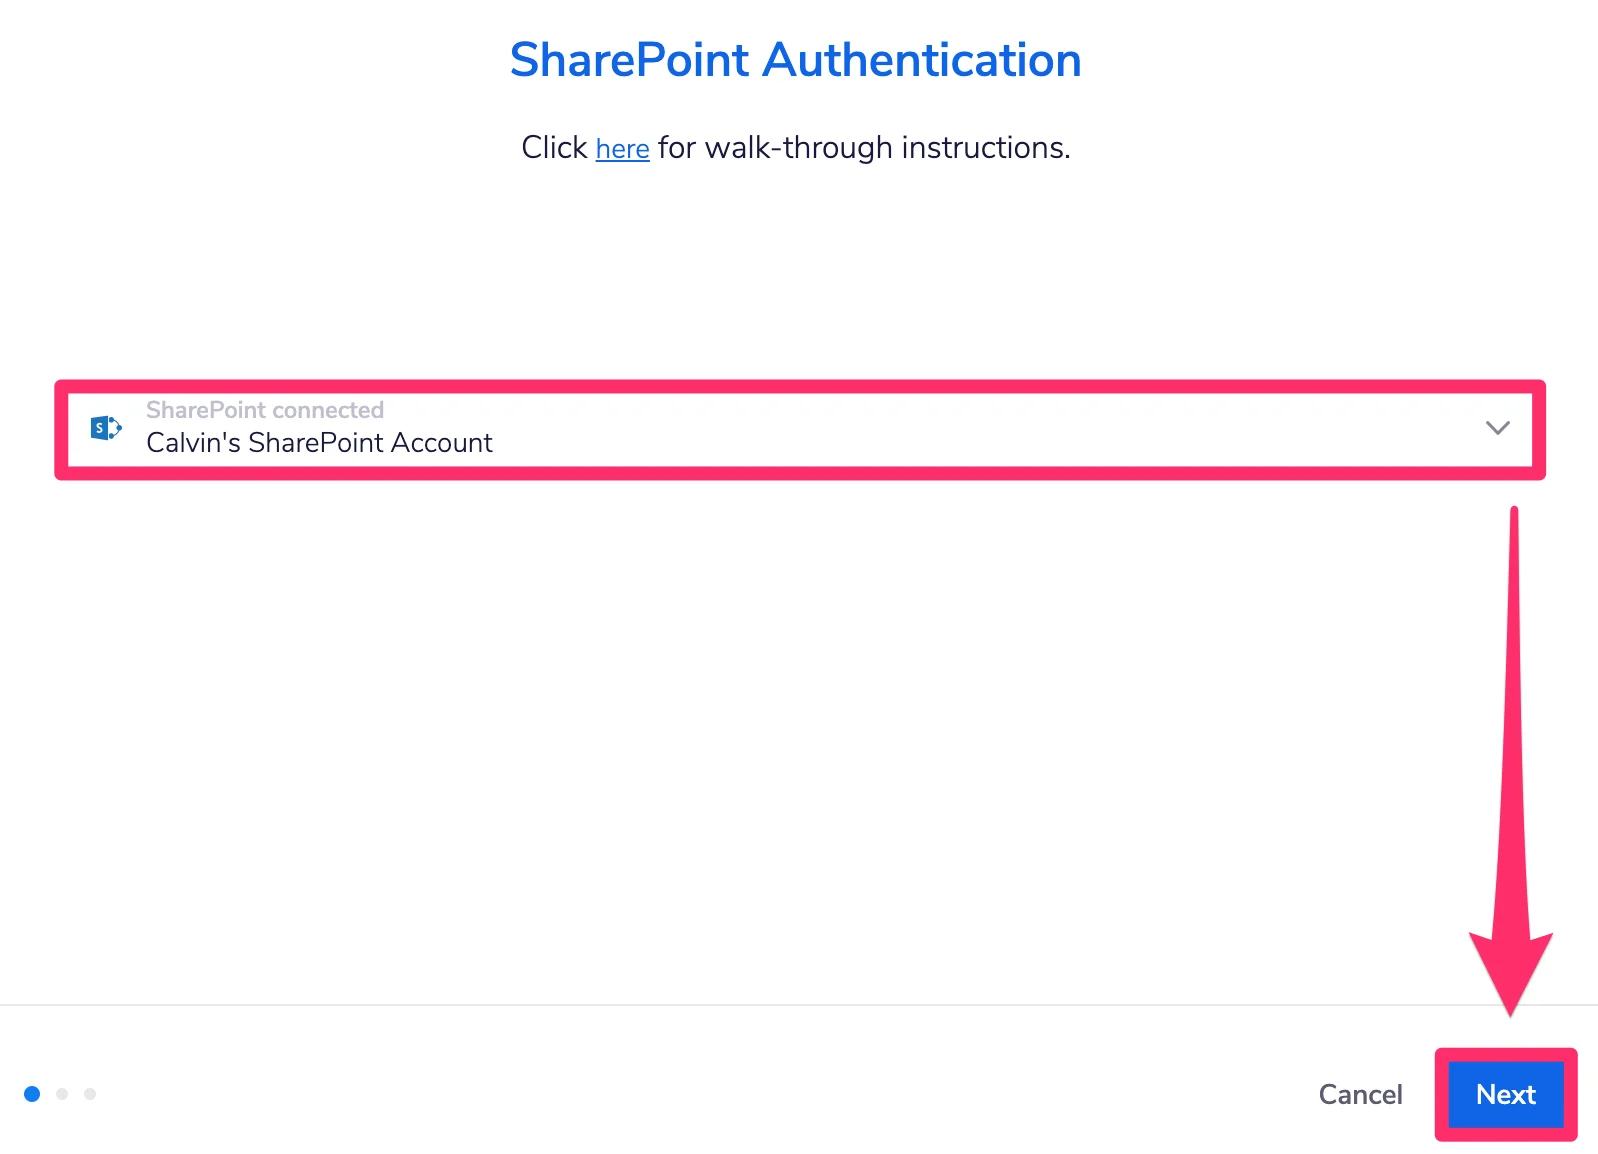
 4. Select an existing authentication method or create a new one if it's your first time.
 * **For integrations created AFTER February 26, 2026** (using new authentication):
* If creating new, enter the three values from your Azure App registration:
* **Tenant ID**
* **Client ID**
* **Client Secret**
* Click **Connect** to authenticate
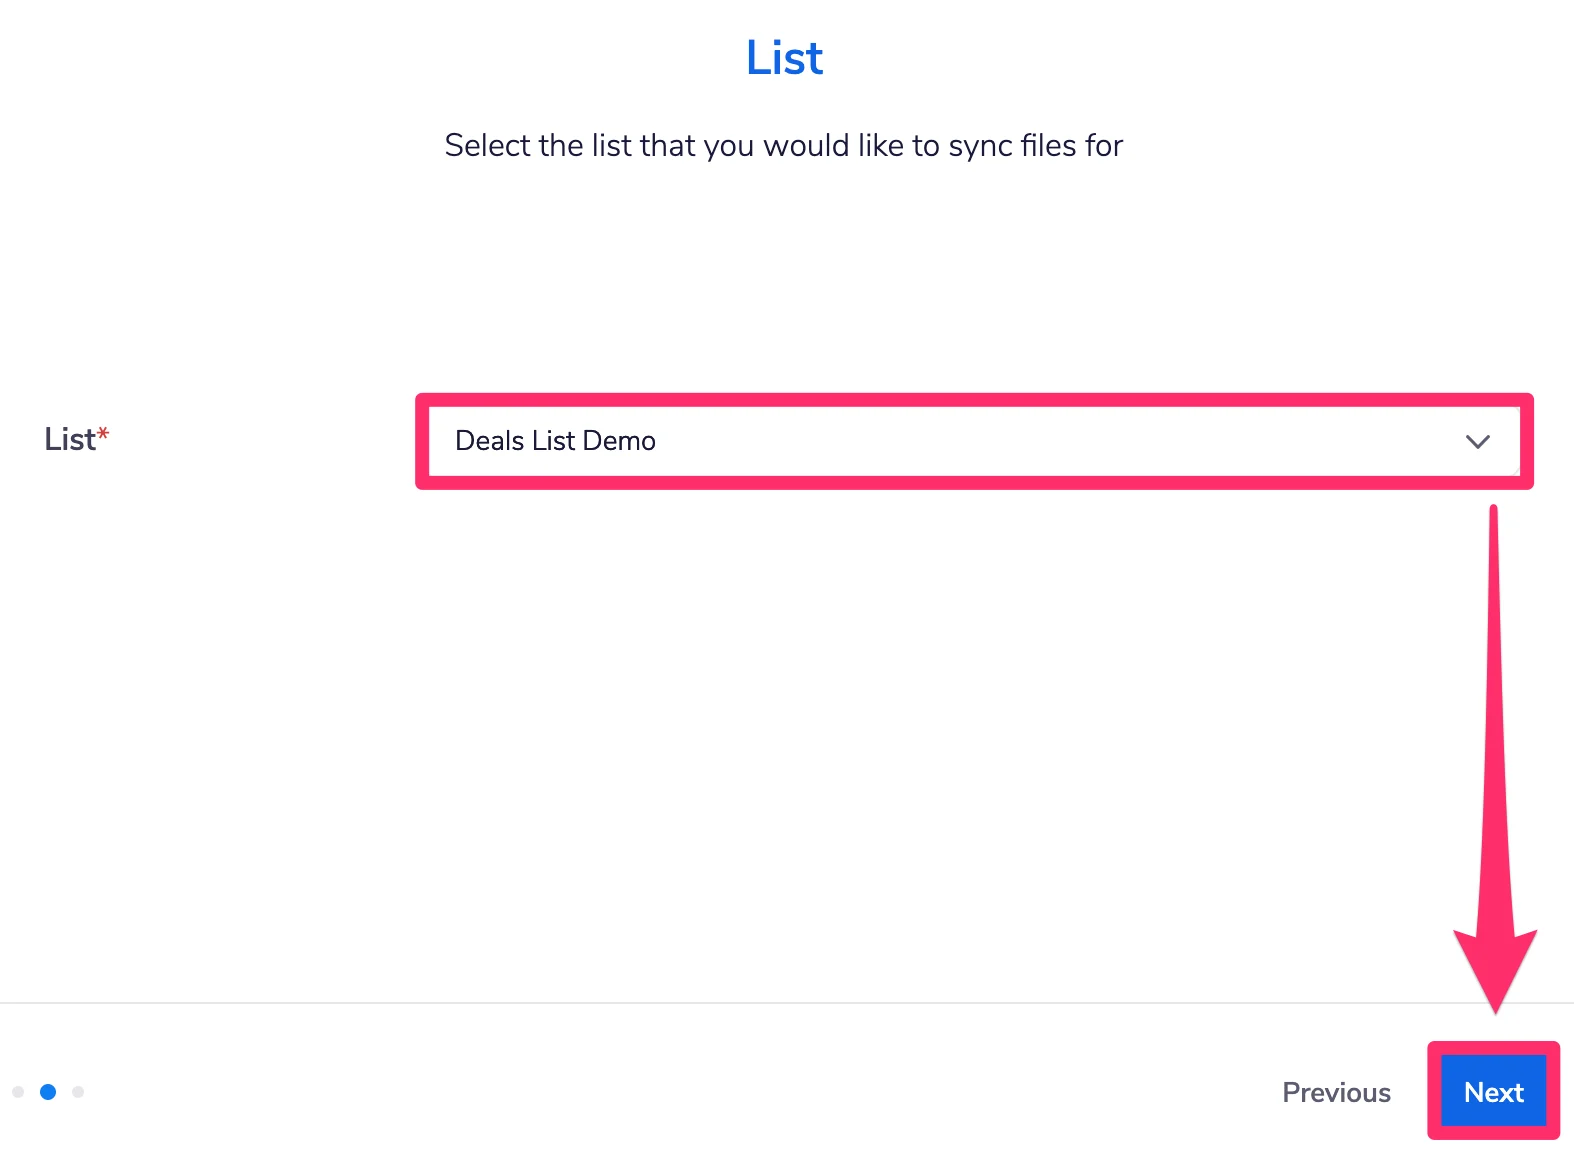
5. Select the Affinity list you'd like to sync from, then click **Next**. Ideally, you’d also want to have this list approved for auto-upload (check out the section titled "How to auto-upload files" within this article: [How to upload, download, and remove files in Affinity](https://affinity2ndorg.lightning.force.com/articles/Knowledge/How-to-upload-download-and-remove-files-in-Affinity)) in your privacy settings, as we only sync files that are uploaded to Affinity, not those that are in the **found in your email** section.
* **For integrations created AFTER February 26, 2026** (using new authentication):
* If creating new, enter the three values from your Azure App registration:
* **Tenant ID**
* **Client ID**
* **Client Secret**
* Click **Connect** to authenticate
5. Select the Affinity list you'd like to sync from, then click **Next**. Ideally, you’d also want to have this list approved for auto-upload (check out the section titled "How to auto-upload files" within this article: [How to upload, download, and remove files in Affinity](https://affinity2ndorg.lightning.force.com/articles/Knowledge/How-to-upload-download-and-remove-files-in-Affinity)) in your privacy settings, as we only sync files that are uploaded to Affinity, not those that are in the **found in your email** section.
 * **Note**: Once it is set up, this integration will automatically backfill for already-uploaded files on Affinity profile pages, upload them to the designated SharePoint folder, and continuously sync for new files that get uploaded to Affinity over time.
6. Next, get the name of your **Root** folder, and the **Filepath** where you would you like to have the files be uploaded to.
* **Note**: Once it is set up, this integration will automatically backfill for already-uploaded files on Affinity profile pages, upload them to the designated SharePoint folder, and continuously sync for new files that get uploaded to Affinity over time.
6. Next, get the name of your **Root** folder, and the **Filepath** where you would you like to have the files be uploaded to.
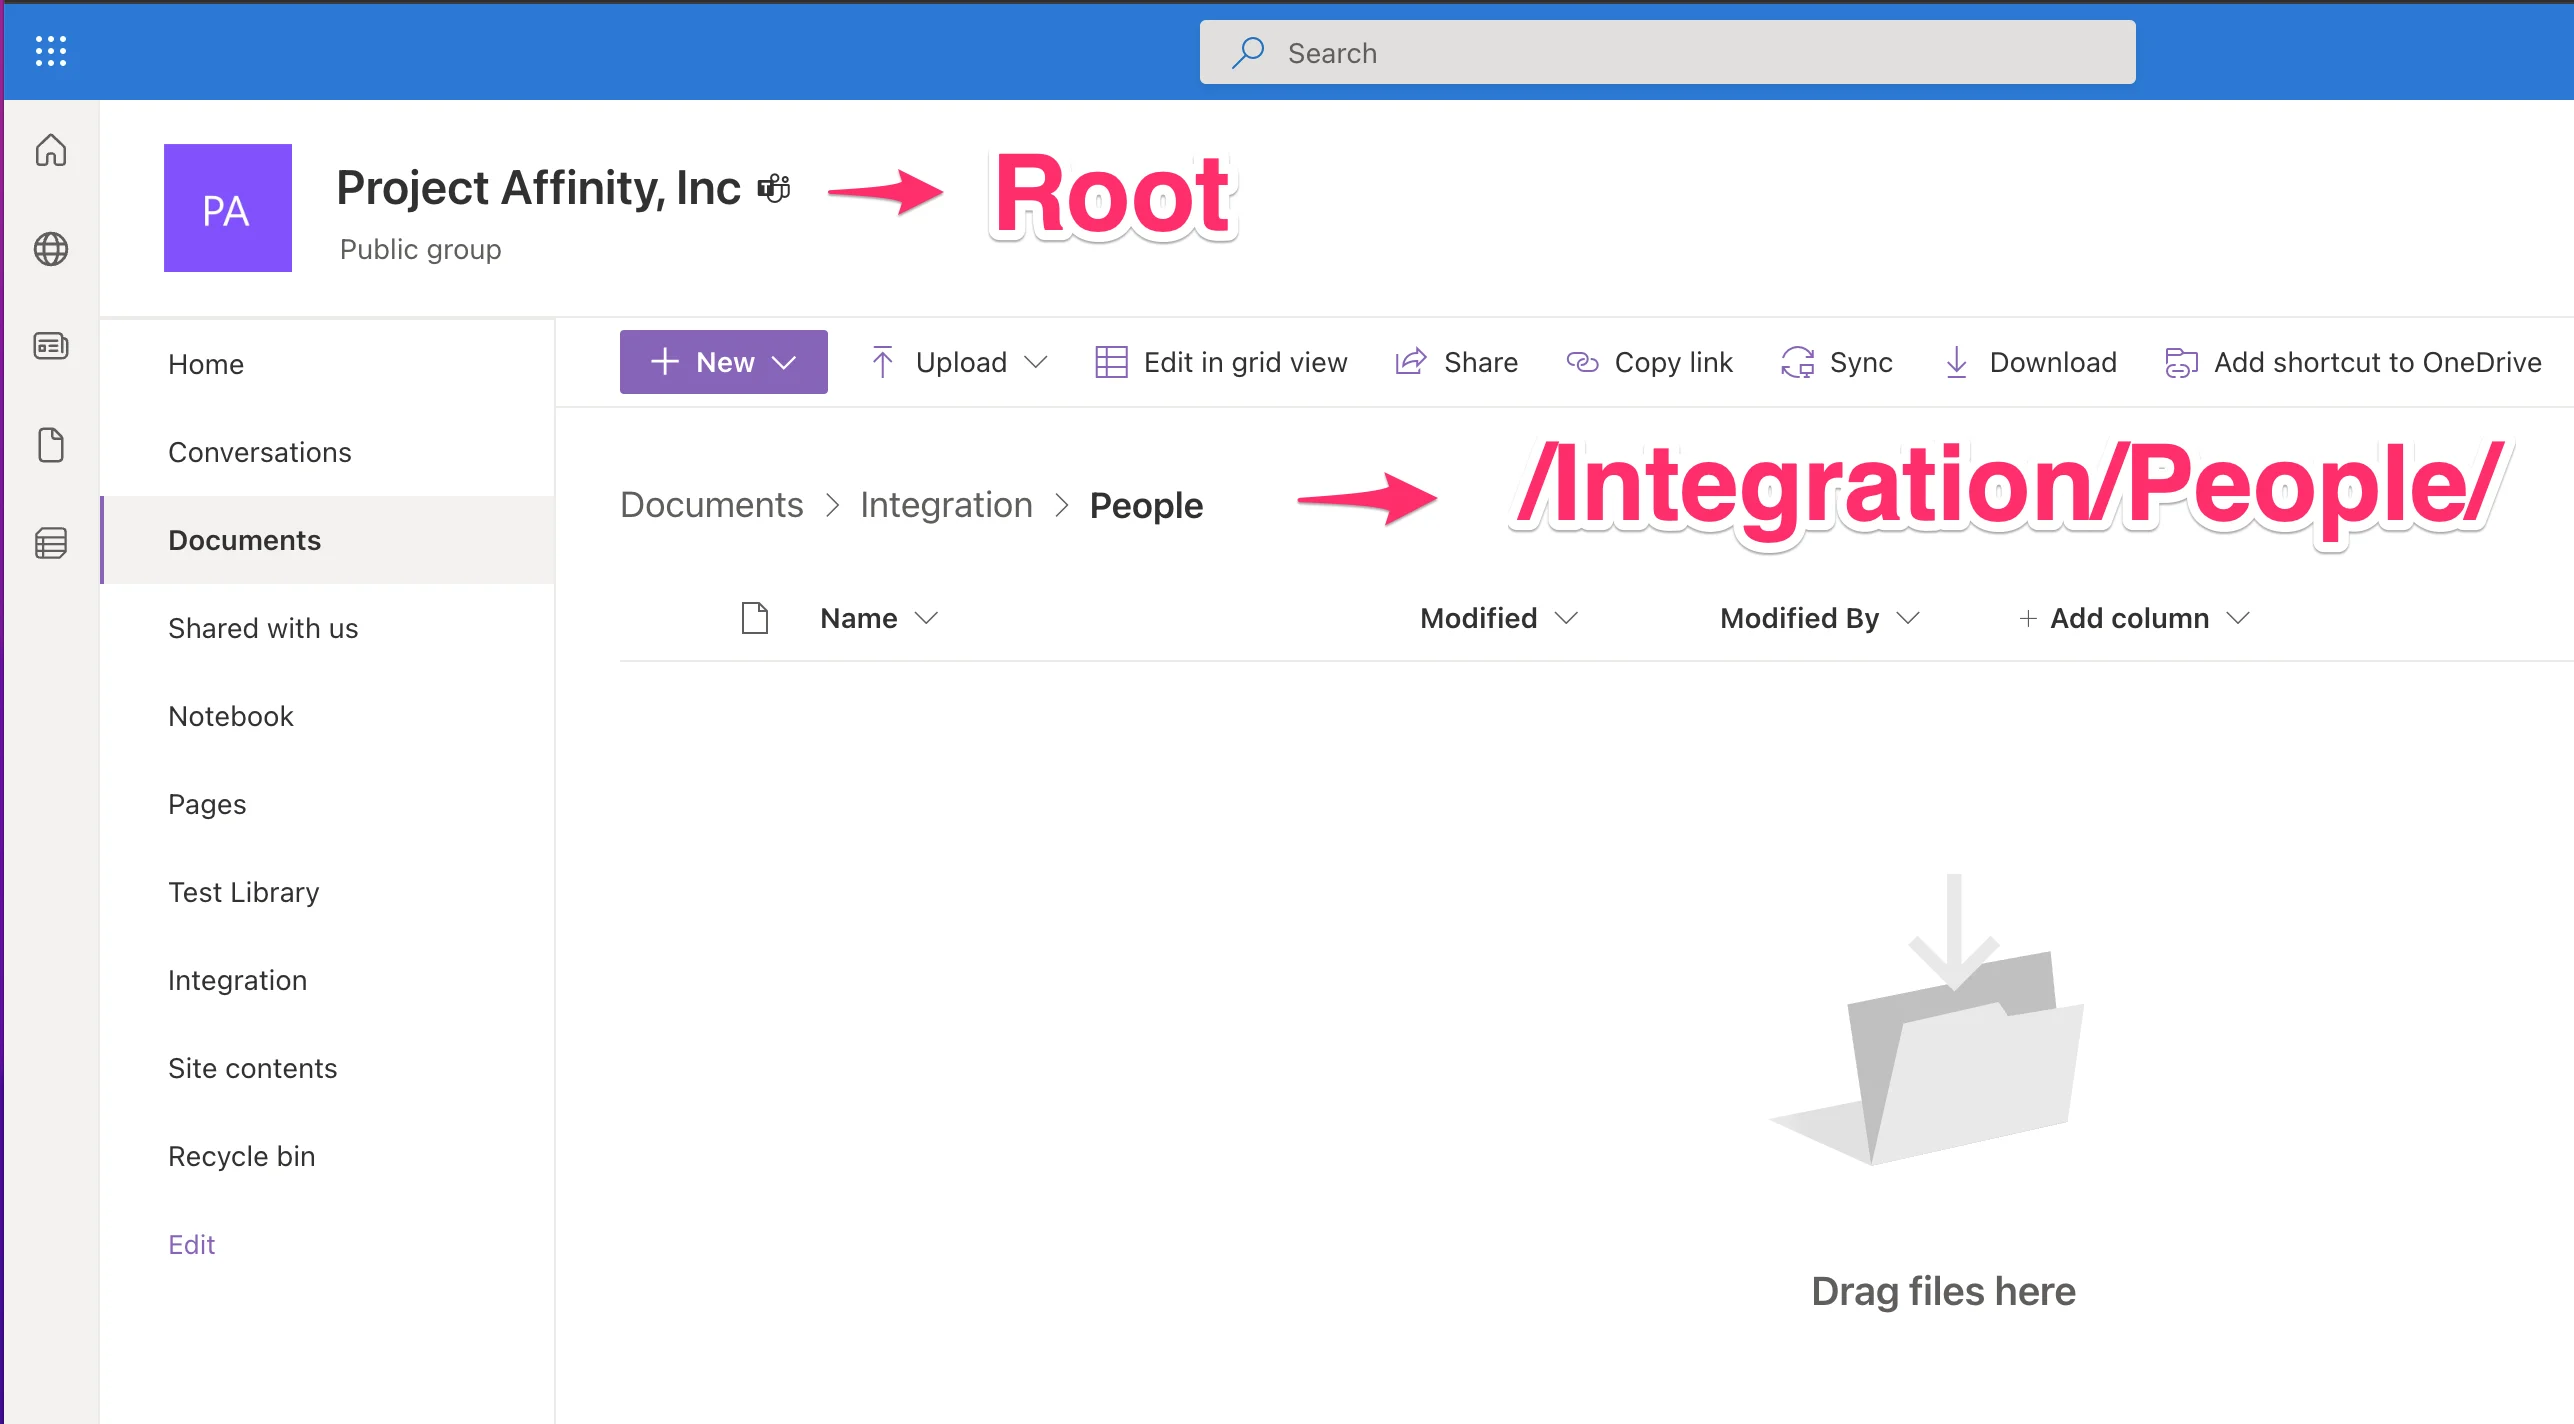 7. On the following screen, you would need to select the root folder, and enter your file path.
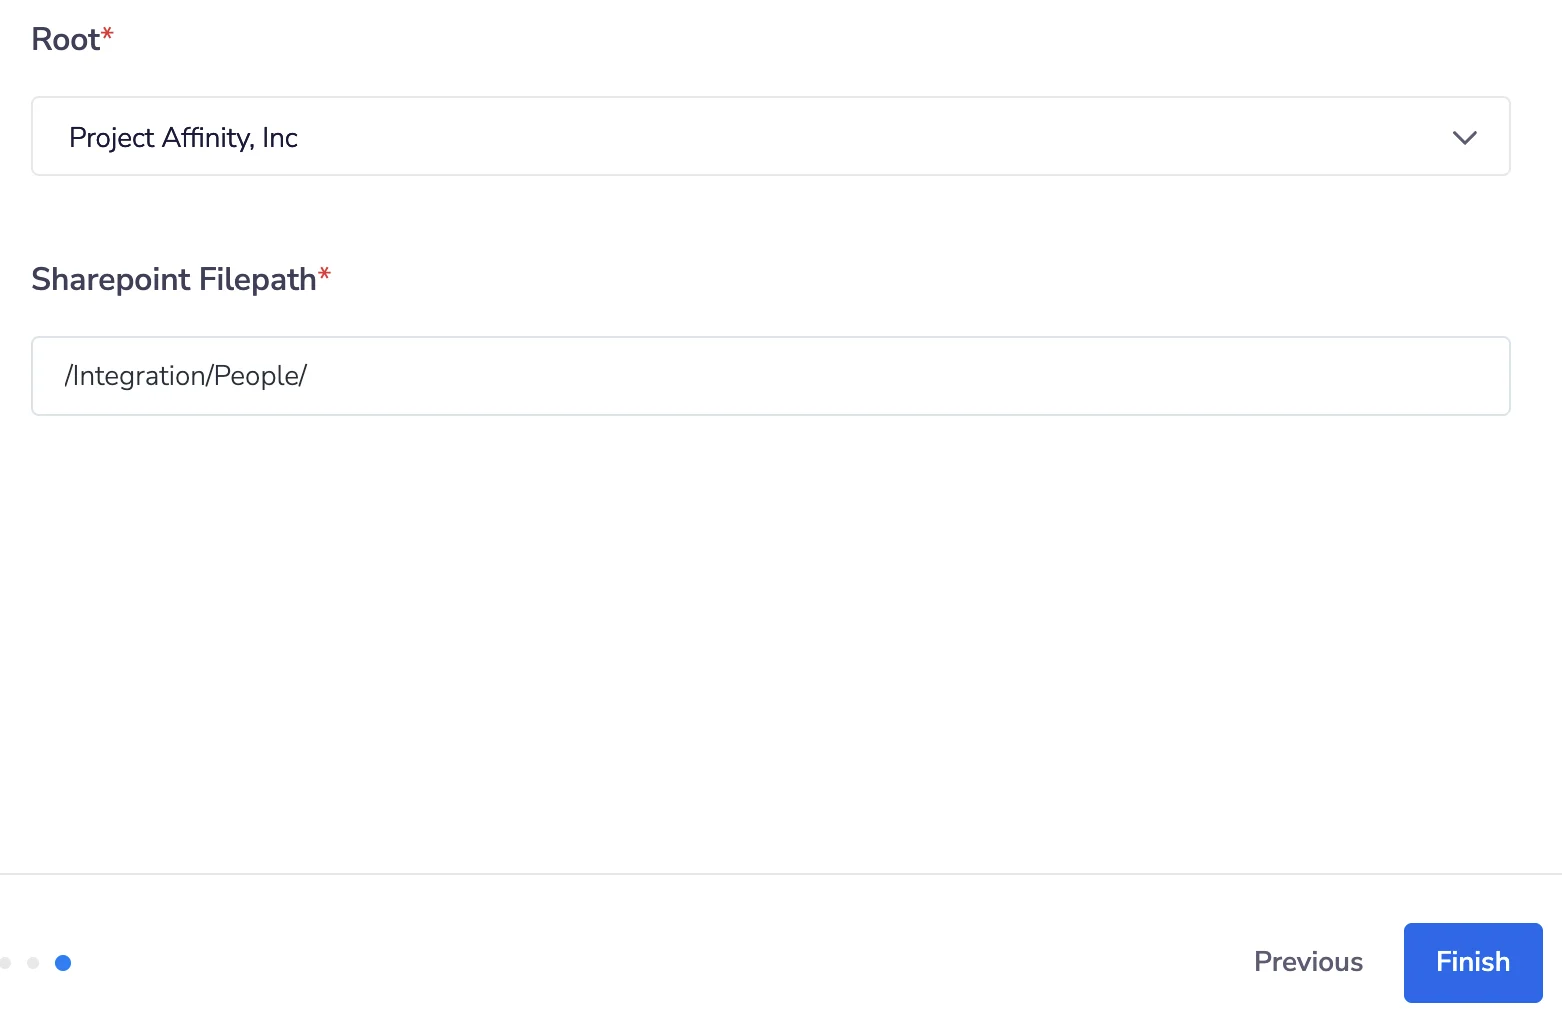 * In this example, we will select **Project Affinity, Inc** as the **Root**.
* The Sharepoint Filepath **/Integration/People/** is case sensitive and requires the forward slashes in the beginning and end. The default is to the Documents folder, so there is no need to add "Documents" to the filepath.
* Finally, click **Finish** to complete the integration.
8. Within the designated folder/filepath, an individual folder will be auto-created for each entity and contain their respective files based on the files that get uploaded to their Affinity profile pages.
## Re-authenticate Existing Integration (Required after February 26, 2026)
If you set up your SharePoint integration before February 26, 2026, you must re-authenticate it to continue working after April 1, 2026.
### Step 1: Create Azure App Registration
Follow the "New Authentication Setup" steps above to create an App registration in Microsoft Azure and collect your Tenant ID, Client ID, and Client Secret.
### Step 2: Update Integration in Affinity
1. Log in to Affinity as an admin user
2. Go to **Settings** > **Integrations** > **Microsoft SharePoint**
3. Click **Edit** on your active SharePoint integration
4. Click **New authentication**
5. Enter the three values from your Azure App registration:
* **Tenant ID**
* **Client ID**
* **Client Secret**
6. Click **Connect** to authenticate
7. Complete the workflow to save your changes
### Step 3: Update Additional Integrations (if applicable)
If you have multiple SharePoint integrations, you'll need to update each one:
1. Edit each additional integration
2. Either:
* **Option 1** (Recommended): Reuse the SharePoint v5 authentication you created in Step 2
* **Option 2**: Create a new authentication with a separate Client Secret if you need more granular access controls
Most customers will use Option 1 to reuse the same authentication across all integrations.
> ⚠️ **Critical**: Integrations that remain with the previous authentication after April 1, 2026 are subject to stop working correctly.
## **Frequently Asked Questions**
**Which list types are supported for this integration?**
* All three list types are supported: people lists, organization lists, and opportunity lists
**What are the scopes required to set up this integration?**
**For integrations created before February 26, 2026:**
* See the following screenshots below:
* In this example, we will select **Project Affinity, Inc** as the **Root**.
* The Sharepoint Filepath **/Integration/People/** is case sensitive and requires the forward slashes in the beginning and end. The default is to the Documents folder, so there is no need to add "Documents" to the filepath.
* Finally, click **Finish** to complete the integration.
8. Within the designated folder/filepath, an individual folder will be auto-created for each entity and contain their respective files based on the files that get uploaded to their Affinity profile pages.
## Re-authenticate Existing Integration (Required after February 26, 2026)
If you set up your SharePoint integration before February 26, 2026, you must re-authenticate it to continue working after April 1, 2026.
### Step 1: Create Azure App Registration
Follow the "New Authentication Setup" steps above to create an App registration in Microsoft Azure and collect your Tenant ID, Client ID, and Client Secret.
### Step 2: Update Integration in Affinity
1. Log in to Affinity as an admin user
2. Go to **Settings** > **Integrations** > **Microsoft SharePoint**
3. Click **Edit** on your active SharePoint integration
4. Click **New authentication**
5. Enter the three values from your Azure App registration:
* **Tenant ID**
* **Client ID**
* **Client Secret**
6. Click **Connect** to authenticate
7. Complete the workflow to save your changes
### Step 3: Update Additional Integrations (if applicable)
If you have multiple SharePoint integrations, you'll need to update each one:
1. Edit each additional integration
2. Either:
* **Option 1** (Recommended): Reuse the SharePoint v5 authentication you created in Step 2
* **Option 2**: Create a new authentication with a separate Client Secret if you need more granular access controls
Most customers will use Option 1 to reuse the same authentication across all integrations.
> ⚠️ **Critical**: Integrations that remain with the previous authentication after April 1, 2026 are subject to stop working correctly.
## **Frequently Asked Questions**
**Which list types are supported for this integration?**
* All three list types are supported: people lists, organization lists, and opportunity lists
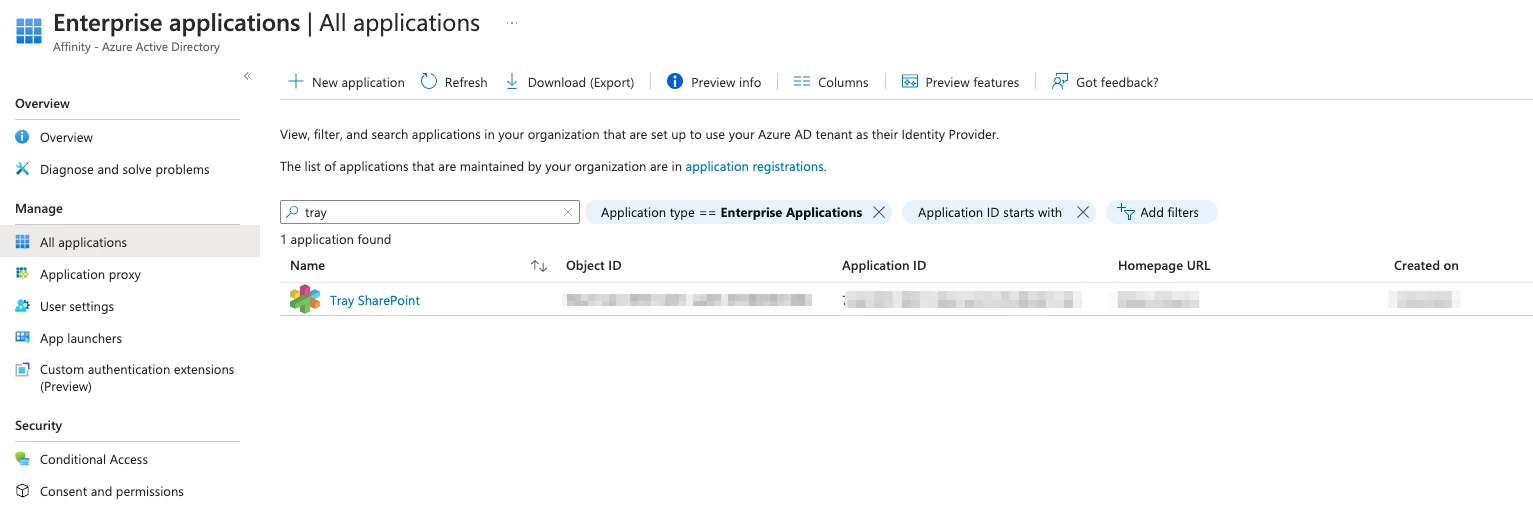
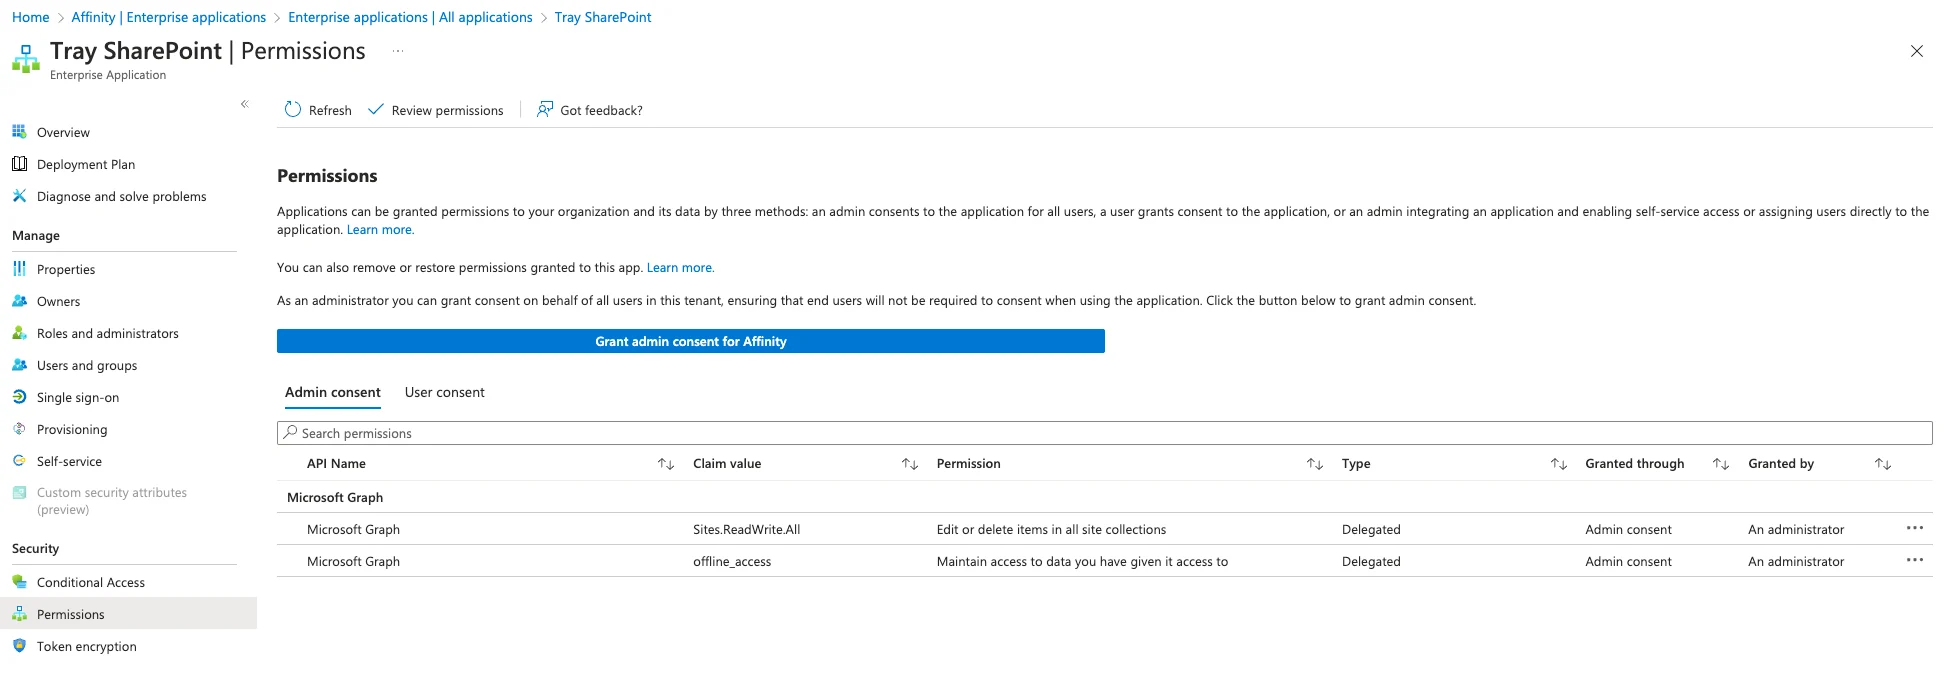
**What are the scopes required to set up this integration?**
**For integrations created before February 26, 2026:**
* See the following screenshots below:
 **For integrations created after February 26, 2026:**
* These must be granted admin consent in your Azure App registration
* Required Microsoft Graph API permissions:
* offline\_access⏎
* Sites.Manage.All
* [Sites.Read](http://Sites.Read).All
* Sites.ReadWrite.All
* Sites.Selected
* [User.Read](http://User.Read)
**Do I need to do anything if I don't have a SharePoint integration?**
* No action needed. This only affects customers with active SharePoint integrations.
**What happens if I don't re-authenticate by April 1, 2026?**
* Your SharePoint integration may stop syncing files correctly
* We recommend re-authenticating as soon as possible after February 26, 2026 to avoid any disruption
**Can I test the new authentication before switching my production integration?**
* Yes, you can create a test integration with a test list to validate the new authentication flow works correctly
* Once validated, update your production integrations
**I'm having trouble with the Azure App registration. Where can I get help?**
* Refer to Tray's detailed setup guide: [https://docs.tray.ai/connectors/service/sharepoint#version-5-0](https://docs.tray.ai/connectors/service/sharepoint#version-5-0)
* Contact Affinity support at [support@affinity.co](mailto:support@affinity.co) if you need assistance
* Your IT or Azure administrator may also be able to help with the App registration setup
**Will my existing synced files be affected?**
* No, files already synced to SharePoint will remain unchanged
* Re-authentication only affects future file syncing
* The integration will continue syncing new files once re-authenticated
**Do I need separate App registrations for each integration?**
* No, you can reuse the same App registration (and thus the same Tenant ID, Client ID, and Client Secret) across multiple SharePoint integrations
* Only create separate App registrations if you need different permission scopes for different integrations
**What will happen after the expiry date I choose when creating the client secret?**
* Microsoft is enforcing stricter security measures. If no action is taken, your integration will stop working after the expiry. We strongly recommend you set a reminder closer to the expiry date to rotate the client secret, and re-authenticate in the existing workflows.
**For integrations created after February 26, 2026:**
* These must be granted admin consent in your Azure App registration
* Required Microsoft Graph API permissions:
* offline\_access⏎
* Sites.Manage.All
* [Sites.Read](http://Sites.Read).All
* Sites.ReadWrite.All
* Sites.Selected
* [User.Read](http://User.Read)
**Do I need to do anything if I don't have a SharePoint integration?**
* No action needed. This only affects customers with active SharePoint integrations.
**What happens if I don't re-authenticate by April 1, 2026?**
* Your SharePoint integration may stop syncing files correctly
* We recommend re-authenticating as soon as possible after February 26, 2026 to avoid any disruption
**Can I test the new authentication before switching my production integration?**
* Yes, you can create a test integration with a test list to validate the new authentication flow works correctly
* Once validated, update your production integrations
**I'm having trouble with the Azure App registration. Where can I get help?**
* Refer to Tray's detailed setup guide: [https://docs.tray.ai/connectors/service/sharepoint#version-5-0](https://docs.tray.ai/connectors/service/sharepoint#version-5-0)
* Contact Affinity support at [support@affinity.co](mailto:support@affinity.co) if you need assistance
* Your IT or Azure administrator may also be able to help with the App registration setup
**Will my existing synced files be affected?**
* No, files already synced to SharePoint will remain unchanged
* Re-authentication only affects future file syncing
* The integration will continue syncing new files once re-authenticated
**Do I need separate App registrations for each integration?**
* No, you can reuse the same App registration (and thus the same Tenant ID, Client ID, and Client Secret) across multiple SharePoint integrations
* Only create separate App registrations if you need different permission scopes for different integrations
**What will happen after the expiry date I choose when creating the client secret?**
* Microsoft is enforcing stricter security measures. If no action is taken, your integration will stop working after the expiry. We strongly recommend you set a reminder closer to the expiry date to rotate the client secret, and re-authenticate in the existing workflows.