> ## Documentation Index
> Fetch the complete documentation index at: https://support.affinity.co/llms.txt
> Use this file to discover all available pages before exploring further.
# How to customize saved views in your lists
> Help center how-to
## Customize saved views in Classic Lists
Customize your saved views in any list by finding and selecting relevant columns, creating new columns, and reordering them the way you like.
### How to customize your saved view
1. Click the **Customize View** button within your list. Click the **Customize View** button within your list.
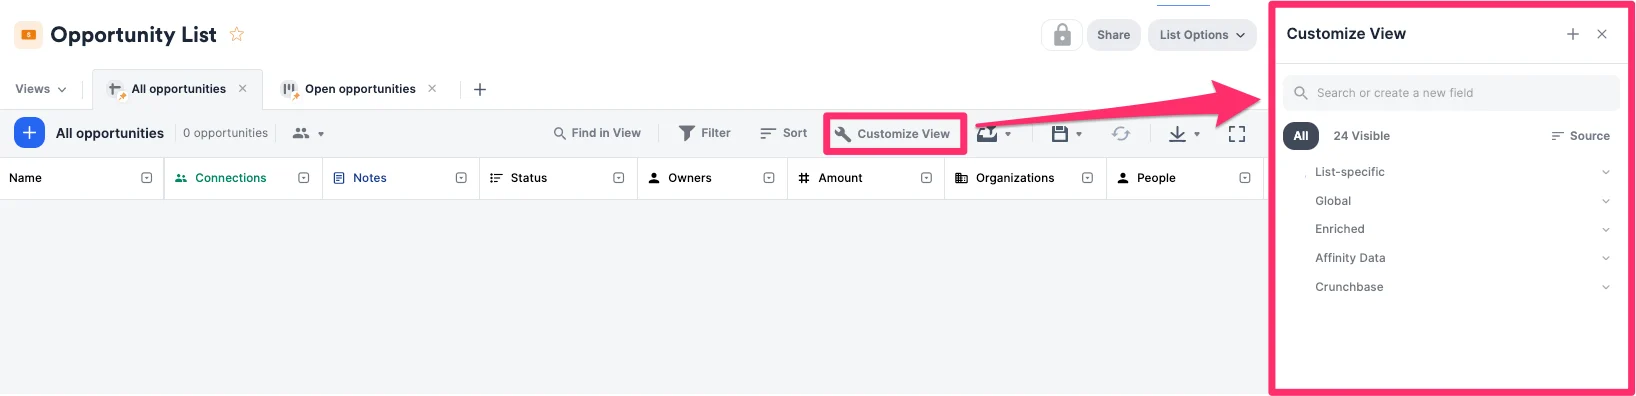 2. [Create a new column](https://support.affinity.co/s/article/How-to-create-a-new-column-field-in-a-list) by clicking on the **+ icon** on the top-right or by typing in the name of the column you'd like to create in the search bar.
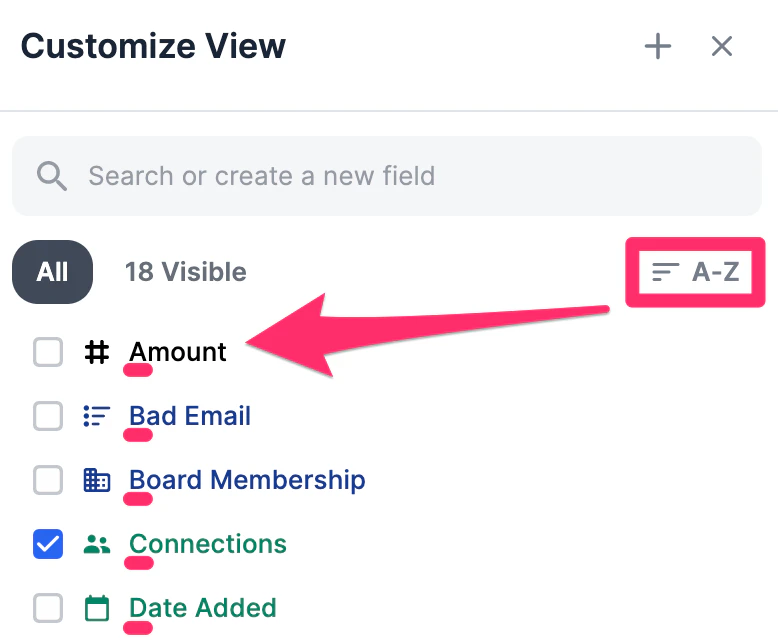
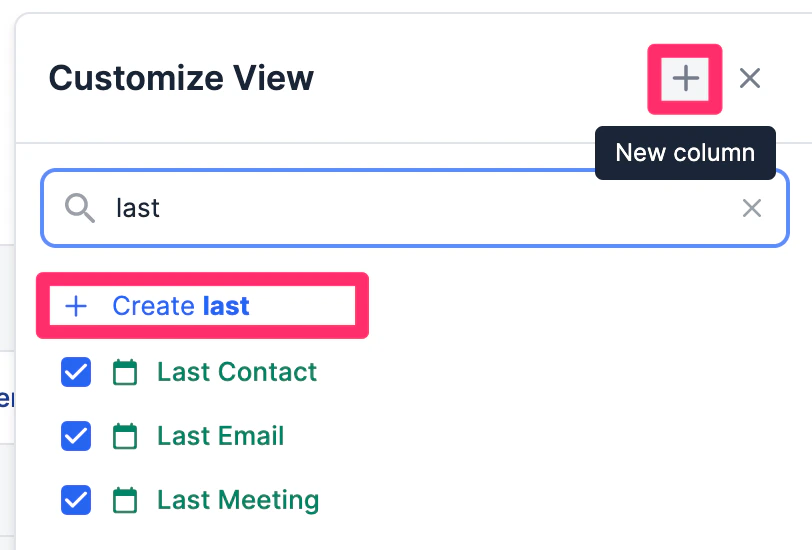 3. **All Tab**: Shows all existing columns and provides you the ability to sort columns by:
* Sort by **A-Z**.
3. **All Tab**: Shows all existing columns and provides you the ability to sort columns by:
* Sort by **A-Z**.
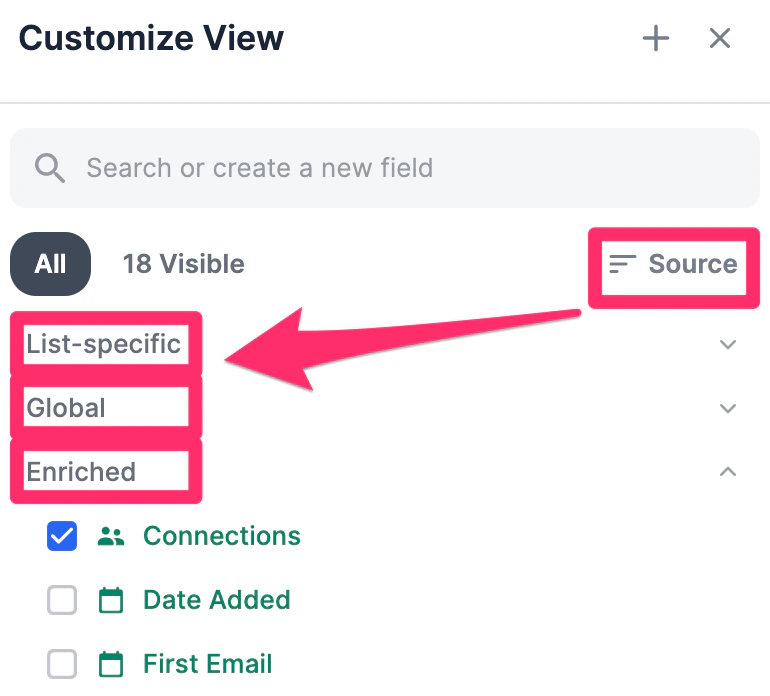
 * Or, sort by **Source** (see a few examples in this article: [Fields: Enriched, Global, and List-specific](https://support.affinity.co/s/article/Enriched-Global-and-List-specific-Fields)).
 4. **Visible Tab**: Shows only the columns currently on the saved view.
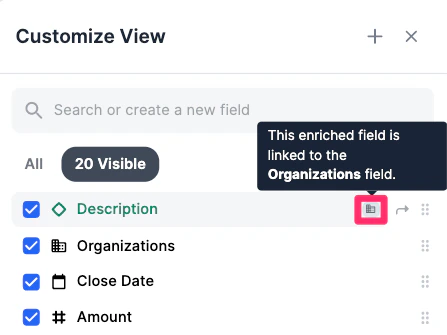
 5. For opportunity lists that contain enriched and global fields from organizations, this **organization icon** shows that the [enriched column](https://support.affinity.co/s/article/Enriched-Global-and-List-specific-Fields) is linked to the values in the **Organizations** field.
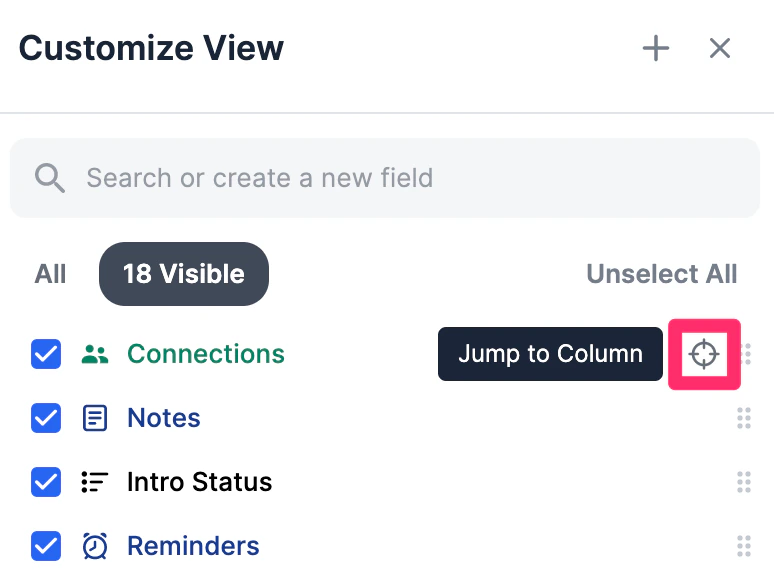
 6. **Jump to Column**: This will quickly jump you to selected column's position within the saved view, so you don't have to scroll around to see it.
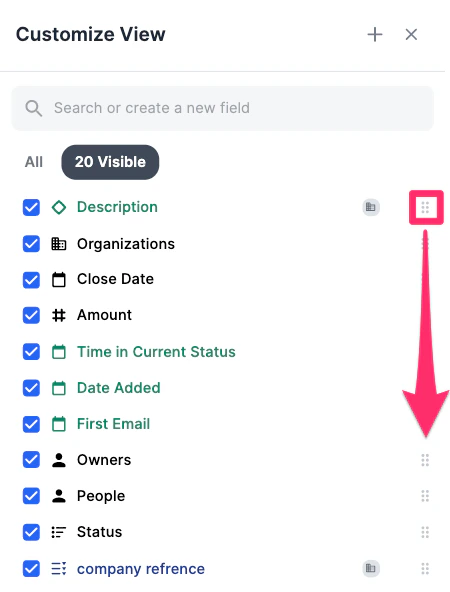
 7. **Reposition**: Click and drag the column to reposition its order within the saved view.
 8. Configure the view’s accessibility and configuration options by click on the lock icon.
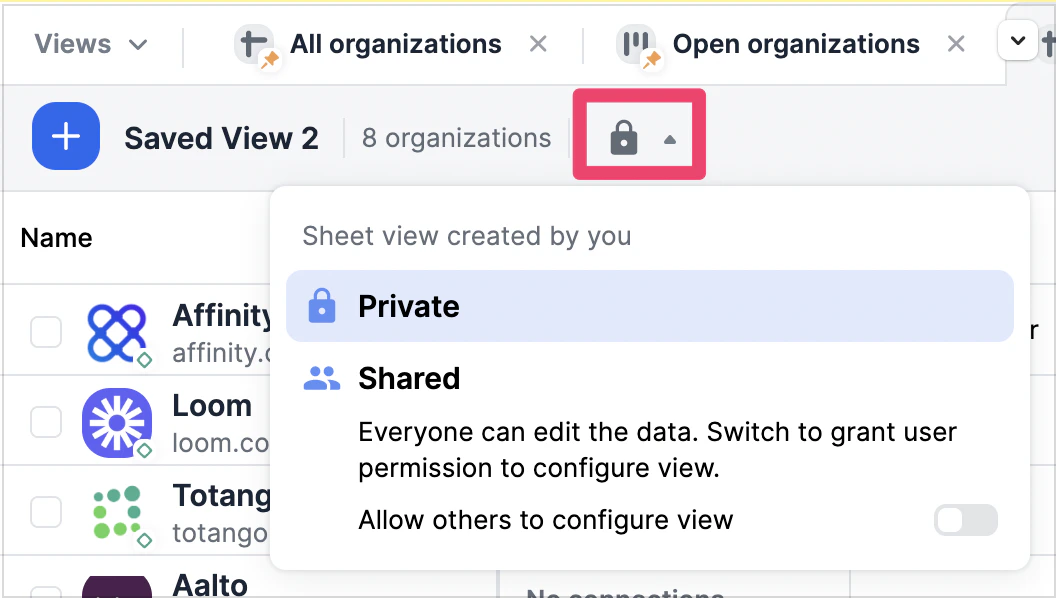 * **Private** - Only you can see the view.
* **Shared** (toggle off) - All users with list access can see the view, but only the **list owner,** **list admins,** or the **Enterprise Admin** (on the **Enterprise** tier) can save changes to the view's configuration.
* **Shared** (toggle on) - All users with list access can see the view and save changes to the view's configuration.
## Customize saved views in new Lists
### Overview
Customize which fields appear in your saved views and their order using the Customize View panel. This guide focuses on display customization - for creating, sharing, and managing views themselves, see How to Create and Use Saved Views in New Lists.
### Prerequisites
* Access to a List in Affinity
* Saved view to customize (or you can customize the default view)
* Edit permission on the view (for shared views with restricted configuration editing)
### Steps
### Step 1: Open Customize View Panel
1. Navigate to the view you want to customize
2. Click the **Customize** button in the toolbar
3. The Customize View panel opens on the right side
### Step 2: Navigate the Customize View Panel
**Panel has two main tabs:**
\*\*All Tab: \*\*
* **Private** - Only you can see the view.
* **Shared** (toggle off) - All users with list access can see the view, but only the **list owner,** **list admins,** or the **Enterprise Admin** (on the **Enterprise** tier) can save changes to the view's configuration.
* **Shared** (toggle on) - All users with list access can see the view and save changes to the view's configuration.
## Customize saved views in new Lists
### Overview
Customize which fields appear in your saved views and their order using the Customize View panel. This guide focuses on display customization - for creating, sharing, and managing views themselves, see How to Create and Use Saved Views in New Lists.
### Prerequisites
* Access to a List in Affinity
* Saved view to customize (or you can customize the default view)
* Edit permission on the view (for shared views with restricted configuration editing)
### Steps
### Step 1: Open Customize View Panel
1. Navigate to the view you want to customize
2. Click the **Customize** button in the toolbar
3. The Customize View panel opens on the right side
### Step 2: Navigate the Customize View Panel
**Panel has two main tabs:**
\*\*All Tab: \*\*
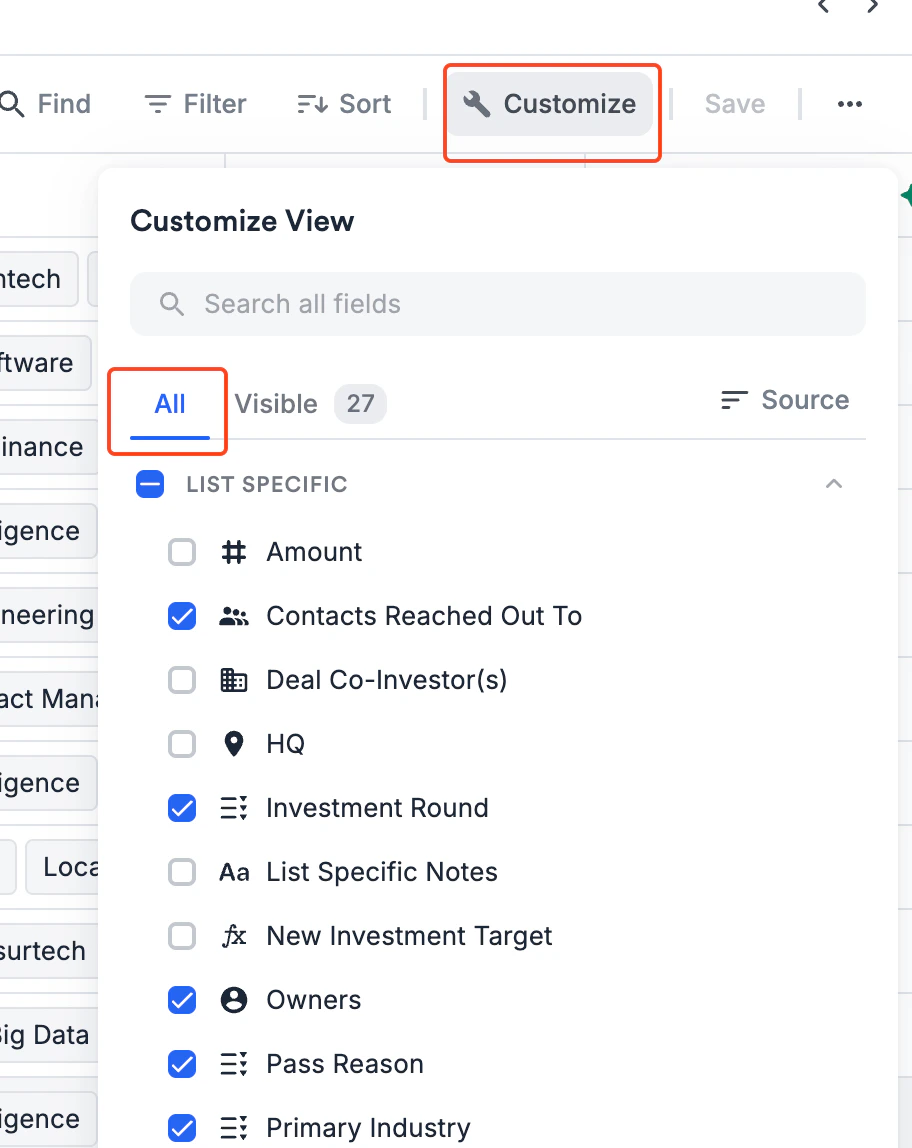 * Shows all available fields you can add to your view
* Organized by field categories
* Includes fields currently visible and hidden
* Use for finding and adding new columns
\*\*Visible Tab: \*\*
* Shows all available fields you can add to your view
* Organized by field categories
* Includes fields currently visible and hidden
* Use for finding and adding new columns
\*\*Visible Tab: \*\*
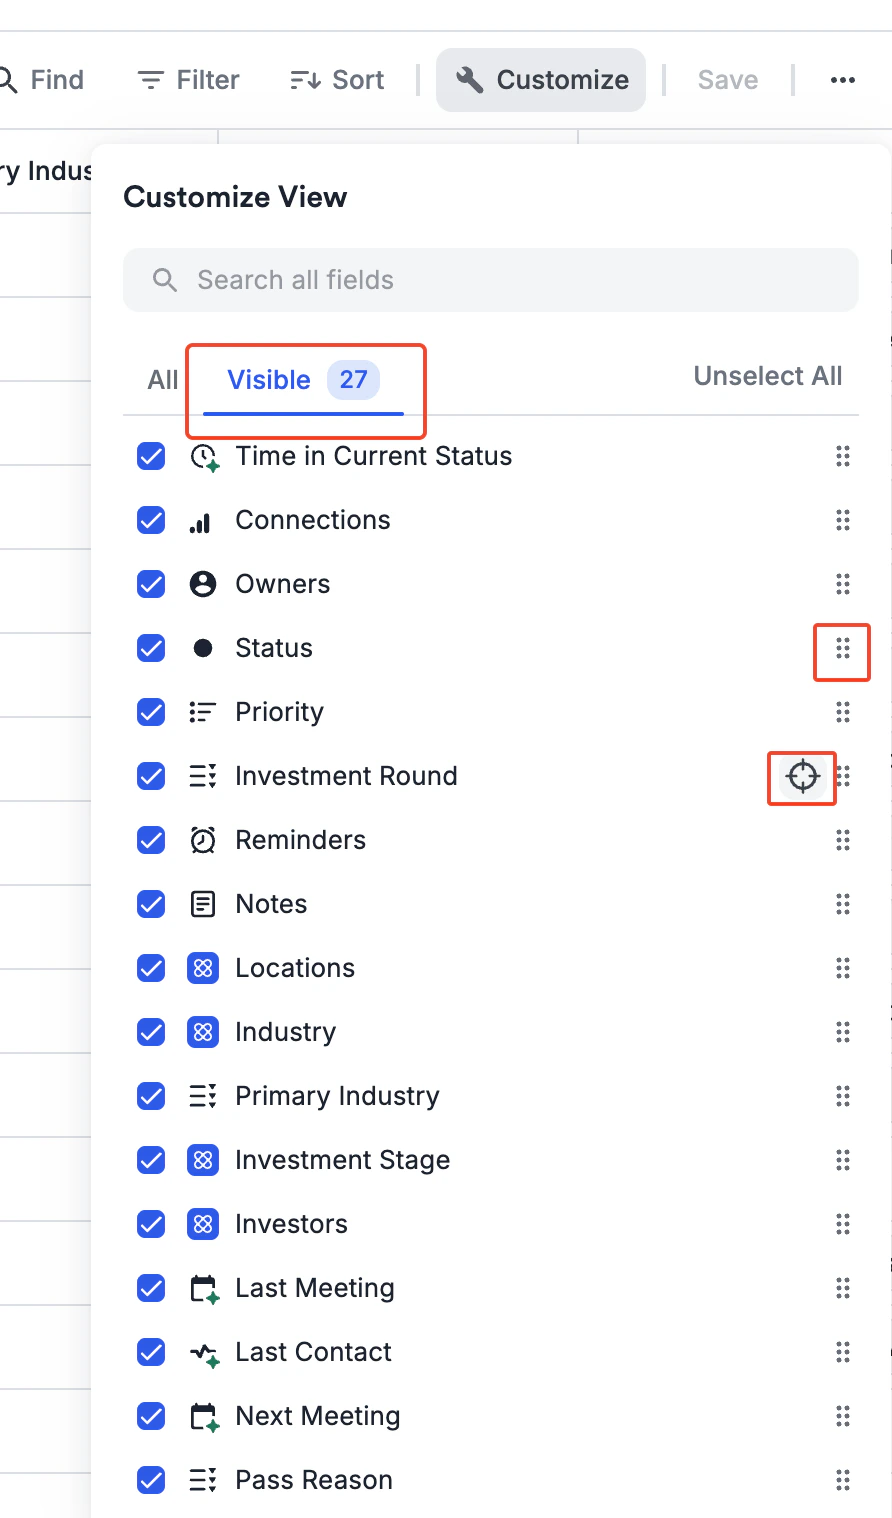 * Shows only columns currently displayed in your view
* Use **Jump to Column** to quickly locate a column in the saved view.
* Use **Reposition** (drag-and-drop) to reorder columns.
* Icons may indicate linked fields (e.g., Organization icon for enriched org-based fields).
### Step 3: Find and Add Columns
#### Using Search
1. In the **All Tab**, use the search bar at top
* Shows only columns currently displayed in your view
* Use **Jump to Column** to quickly locate a column in the saved view.
* Use **Reposition** (drag-and-drop) to reorder columns.
* Icons may indicate linked fields (e.g., Organization icon for enriched org-based fields).
### Step 3: Find and Add Columns
#### Using Search
1. In the **All Tab**, use the search bar at top
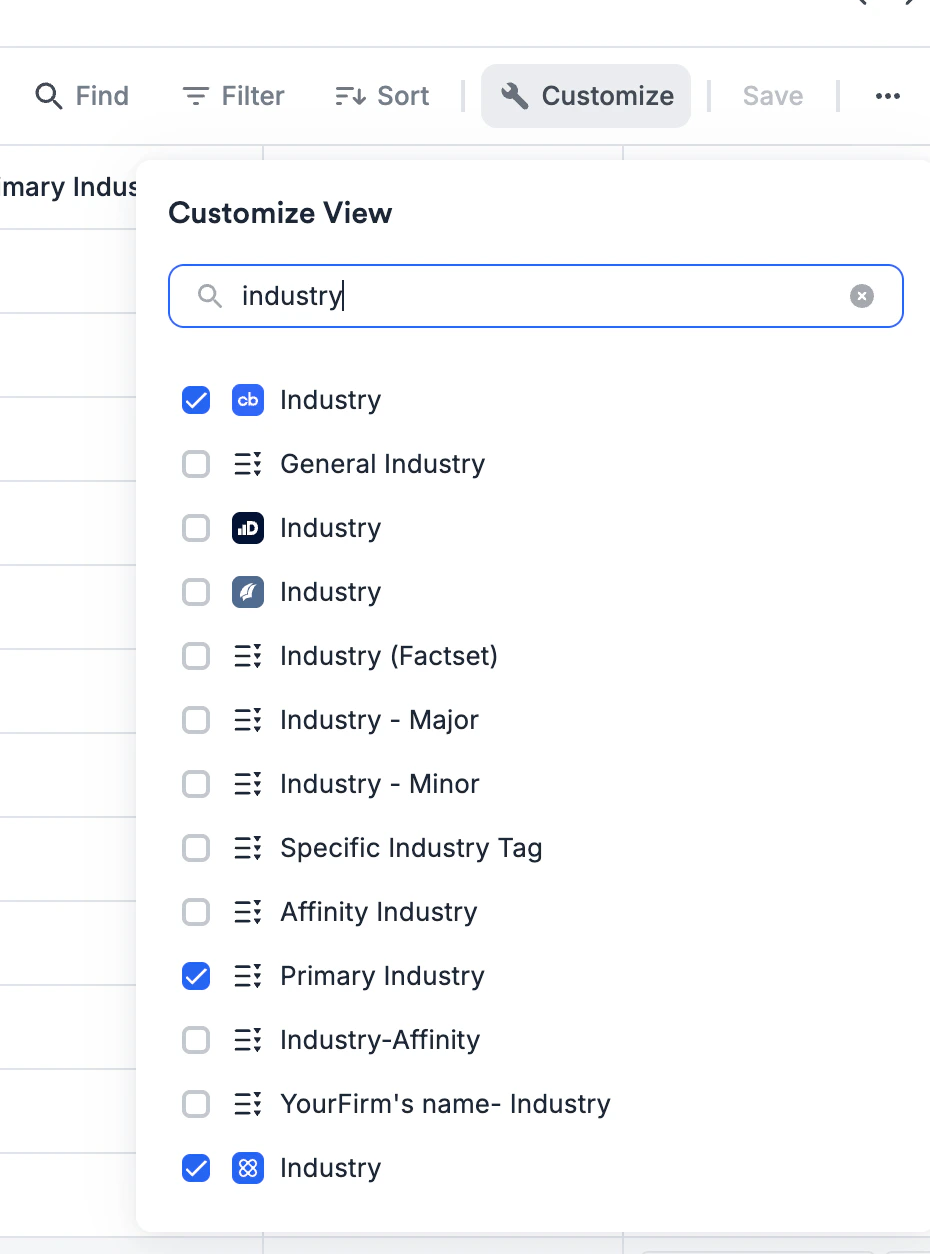 2. Type field name (e.g., "Industry", "Last Contact", "Funding")
3. Matching fields appear
4. Check the box next to field to add to view
5. Field immediately appears as a column in your List
#### Browsing by Category
**Field Categories in New Lists:**
1. **Custom Fields**: List-specific fields you or your team created
2. **Communication Fields**: Last Contact, Last Email, Last Meeting, etc.
3. **Unique Fields**: System fields like Date Added, Connections
4. **Enriched Fields**: Third-party data (Crunchbase, PitchBook, Dealroom, Affinity Data)
**To browse:**
1. Scroll through categories in All Tab
2. Fields grouped by category
3. Check boxes to add fields to your view
4. Uncheck boxes to remove fields from view
#### Bulk Actions
**Select all fields in a category:**
1. Click category header checkbox
2. All fields in that category are added/removed
3. Useful for: "Show me all Communication fields" or "Hide all Enriched fields"
**Sort fields for easier finding:**
1. Click **Sort by A-Z** to alphabetize all fields
2. OR click **Sort by Source** to group by field origin
3. Makes finding specific fields easier in long lists
### Step 4: Reorder Columns
#### In the Customize View Panel
1. Switch to **Visible Tab**
2. Click and drag fields up or down
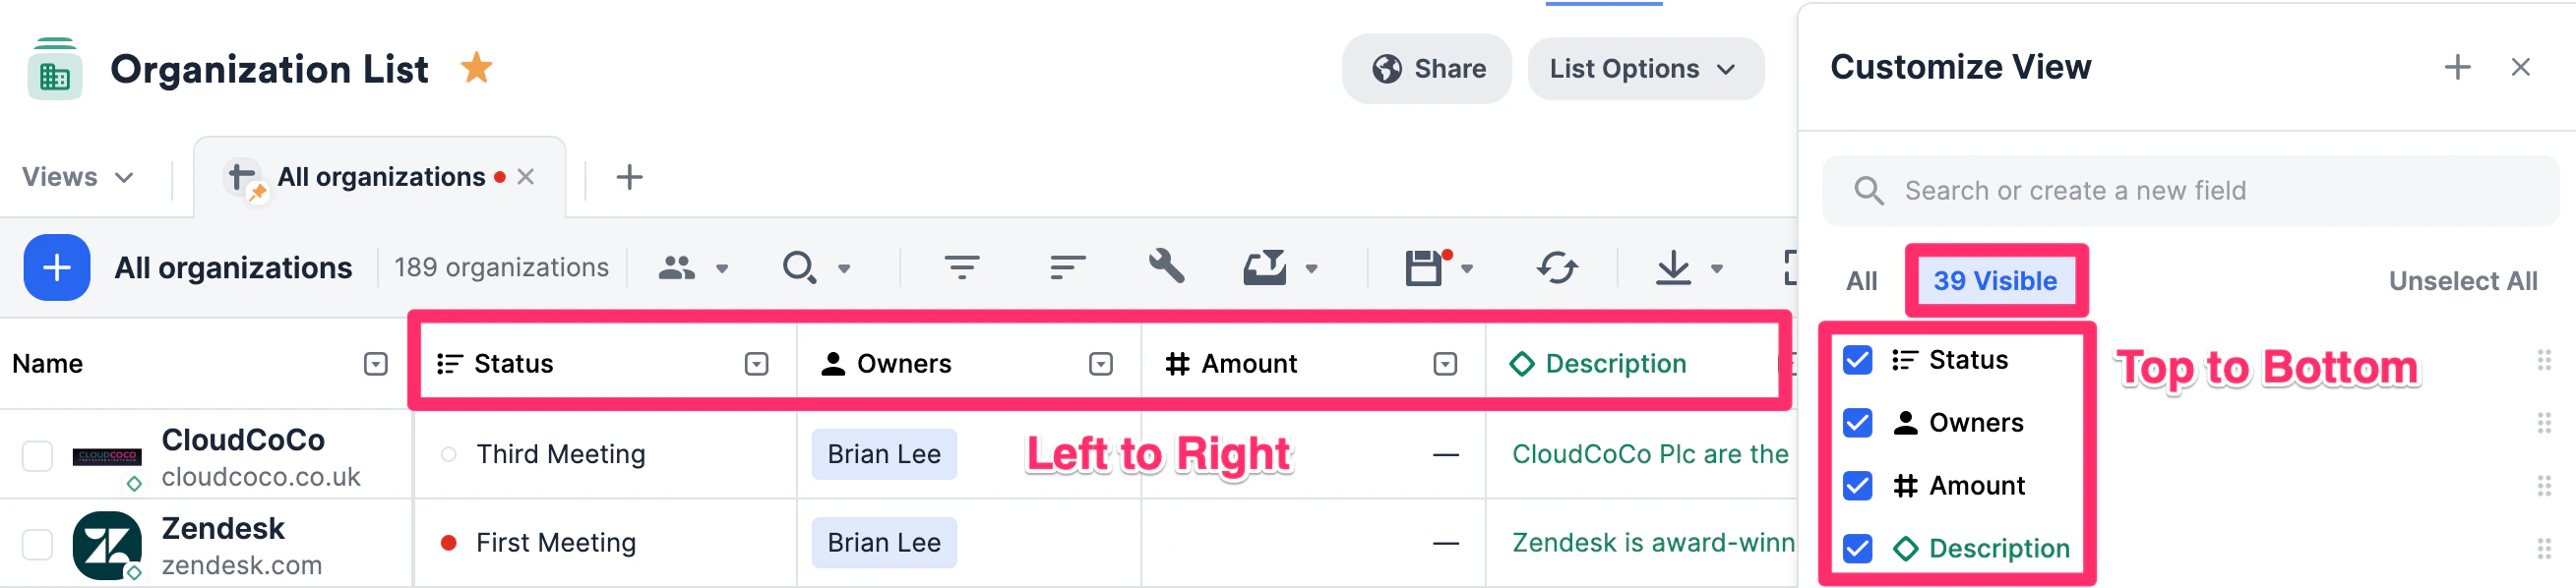
3. Top to bottom order in panel = left-to-right order in your view
4. Place most important fields at top (leftmost in view)
#### Directly in the List View
1. Click and drag column headers left or right
2. Drop in desired position
3. Order automatically updates
**Common ordering patterns:**
* Deal Name → Status → Owner → Last Contact → Next Steps
* Company Name → Industry → Stage → Funding → Location
* Person Name → Title → Company → Last Meeting → Relationship Score
### Step 5: Resize Columns
1. In your List view, hover over column border
2. Cursor changes to resize indicator
3. Click and drag to adjust width
4. Release when desired width achieved
5. Width preference saves with your view
**Tips:**
* Wide columns: Descriptions, Notes, Text fields
* Narrow columns: Status, Owner, Dates, Numbers
* Adjust based on content needs
### Step 6: Use Quick Navigation
**Jump to Column:**
1. In Customize View panel, find the field you want to see
2. Click **Jump to Column** icon
3. List view immediately scrolls to that column's position
4. Useful when you have many columns and can't find specific one
### Step 7: Apply and Save Filters/Sorts
* From the list toolbar, click **Filters** or **Sort** to configure rules.
* **Filters** can combine conditions using Boolean logic (AND/OR), and can include fields not currently visible in the saved view.
* **Sorts** can include up to **five levels** (e.g., Stage → Score → Created Date).
* When saved, these filter/sort settings are stored with the view so everyone sees consistent data.
### Step 8: Save Your Customization
1. After making all column changes, close Customize View panel
2. **Unsaved changes indicator** appears if you modified the view
3. Click **Save** button
4. Click **Save changes** to update view
**For Shared views:** Your column changes affect everyone using the view. Duplicate first if experimenting.
### Expected Outcome
* View displays exactly the columns you need in your preferred order
* Column widths optimized for your content
* Easy switching between different column configurations via view selector
* Team members see consistent column layouts in shared views
* Quick navigation to any column using Jump to Column
* No manual column reconfiguration needed when returning to saved view
### Tips & Best Practices
**Column Selection:**
* **Show only what you need**: Too many columns = harder to scan
* **Match workflow**: Prioritize fields you actually use
* **Consider screen size**: Fewer columns on smaller screens
* **Use categories**: Browse by category to discover related fields
**Column Ordering:**
* **Most important left**: Name, Status, Owner typically first
* **Context fields next**: Industry, Stage, Location
* **Activity fields**: Last Contact, Next Meeting, Reminders
* **Details last**: Descriptions, Notes, less frequently viewed fields
**Column Width:**
* **Name**: Wide enough to see full company names
* **Status/Owner**: Narrow (single word/name)
* **Dates**: Standard width for date format
* **Text fields**: Wide for readability
* **Numbers**: Narrow to medium
**Working with Variants:**
* **Columns can differ** between New Lists and Classic variants
* Use version toggle to verify both variants display correctly
**Performance:**
* **Fewer columns = faster loading**: Especially important for large Lists
* **Show only necessary fields**: Can always add more later
**Team Collaboration:**
* **Standardize column order**: Team views should have consistent layout
* **Document column choices**: Explain why certain fields included in team wiki
* **Consider all use cases**: When creating team views, think about all team members' needs
### Common Use Cases
**Deal Pipeline View:**
"I need to see: Company Name, Status, Owner, Last Contact, Next Steps, and Investment Amount." → Open Customize View, select those 6 fields, reorder Name → Status → Owner → Last Contact → Next Steps → Amount, save view.
**Sourcing Research View:**
"I want to see all enrichment data: Industry, Funding Stage, Total Funding, Investors, Employee Count, Location." → Use Customize View to select all relevant Enriched Fields, group them together in column order, save view.
**Relationship Management View:**
"Show me: Name, Last Meeting, Last Email, Next Meeting, Relationship Score, Connection Strength." → Select all Communication and Relationship fields, order chronologically, save view.
**Minimal Quick Scan View:**
"I just need Name, Status, and Owner for quick daily scans." → Hide all other columns except these 3, save as private view for fast loading.
2. Type field name (e.g., "Industry", "Last Contact", "Funding")
3. Matching fields appear
4. Check the box next to field to add to view
5. Field immediately appears as a column in your List
#### Browsing by Category
**Field Categories in New Lists:**
1. **Custom Fields**: List-specific fields you or your team created
2. **Communication Fields**: Last Contact, Last Email, Last Meeting, etc.
3. **Unique Fields**: System fields like Date Added, Connections
4. **Enriched Fields**: Third-party data (Crunchbase, PitchBook, Dealroom, Affinity Data)
**To browse:**
1. Scroll through categories in All Tab
2. Fields grouped by category
3. Check boxes to add fields to your view
4. Uncheck boxes to remove fields from view
#### Bulk Actions
**Select all fields in a category:**
1. Click category header checkbox
2. All fields in that category are added/removed
3. Useful for: "Show me all Communication fields" or "Hide all Enriched fields"
**Sort fields for easier finding:**
1. Click **Sort by A-Z** to alphabetize all fields
2. OR click **Sort by Source** to group by field origin
3. Makes finding specific fields easier in long lists
### Step 4: Reorder Columns
#### In the Customize View Panel
1. Switch to **Visible Tab**
2. Click and drag fields up or down
3. Top to bottom order in panel = left-to-right order in your view
4. Place most important fields at top (leftmost in view)
#### Directly in the List View
1. Click and drag column headers left or right
2. Drop in desired position
3. Order automatically updates
**Common ordering patterns:**
* Deal Name → Status → Owner → Last Contact → Next Steps
* Company Name → Industry → Stage → Funding → Location
* Person Name → Title → Company → Last Meeting → Relationship Score
### Step 5: Resize Columns
1. In your List view, hover over column border
2. Cursor changes to resize indicator
3. Click and drag to adjust width
4. Release when desired width achieved
5. Width preference saves with your view
**Tips:**
* Wide columns: Descriptions, Notes, Text fields
* Narrow columns: Status, Owner, Dates, Numbers
* Adjust based on content needs
### Step 6: Use Quick Navigation
**Jump to Column:**
1. In Customize View panel, find the field you want to see
2. Click **Jump to Column** icon
3. List view immediately scrolls to that column's position
4. Useful when you have many columns and can't find specific one
### Step 7: Apply and Save Filters/Sorts
* From the list toolbar, click **Filters** or **Sort** to configure rules.
* **Filters** can combine conditions using Boolean logic (AND/OR), and can include fields not currently visible in the saved view.
* **Sorts** can include up to **five levels** (e.g., Stage → Score → Created Date).
* When saved, these filter/sort settings are stored with the view so everyone sees consistent data.
### Step 8: Save Your Customization
1. After making all column changes, close Customize View panel
2. **Unsaved changes indicator** appears if you modified the view
3. Click **Save** button
4. Click **Save changes** to update view
**For Shared views:** Your column changes affect everyone using the view. Duplicate first if experimenting.
### Expected Outcome
* View displays exactly the columns you need in your preferred order
* Column widths optimized for your content
* Easy switching between different column configurations via view selector
* Team members see consistent column layouts in shared views
* Quick navigation to any column using Jump to Column
* No manual column reconfiguration needed when returning to saved view
### Tips & Best Practices
**Column Selection:**
* **Show only what you need**: Too many columns = harder to scan
* **Match workflow**: Prioritize fields you actually use
* **Consider screen size**: Fewer columns on smaller screens
* **Use categories**: Browse by category to discover related fields
**Column Ordering:**
* **Most important left**: Name, Status, Owner typically first
* **Context fields next**: Industry, Stage, Location
* **Activity fields**: Last Contact, Next Meeting, Reminders
* **Details last**: Descriptions, Notes, less frequently viewed fields
**Column Width:**
* **Name**: Wide enough to see full company names
* **Status/Owner**: Narrow (single word/name)
* **Dates**: Standard width for date format
* **Text fields**: Wide for readability
* **Numbers**: Narrow to medium
**Working with Variants:**
* **Columns can differ** between New Lists and Classic variants
* Use version toggle to verify both variants display correctly
**Performance:**
* **Fewer columns = faster loading**: Especially important for large Lists
* **Show only necessary fields**: Can always add more later
**Team Collaboration:**
* **Standardize column order**: Team views should have consistent layout
* **Document column choices**: Explain why certain fields included in team wiki
* **Consider all use cases**: When creating team views, think about all team members' needs
### Common Use Cases
**Deal Pipeline View:**
"I need to see: Company Name, Status, Owner, Last Contact, Next Steps, and Investment Amount." → Open Customize View, select those 6 fields, reorder Name → Status → Owner → Last Contact → Next Steps → Amount, save view.
**Sourcing Research View:**
"I want to see all enrichment data: Industry, Funding Stage, Total Funding, Investors, Employee Count, Location." → Use Customize View to select all relevant Enriched Fields, group them together in column order, save view.
**Relationship Management View:**
"Show me: Name, Last Meeting, Last Email, Next Meeting, Relationship Score, Connection Strength." → Select all Communication and Relationship fields, order chronologically, save view.
**Minimal Quick Scan View:**
"I just need Name, Status, and Owner for quick daily scans." → Hide all other columns except these 3, save as private view for fast loading.