> ## Documentation Index
> Fetch the complete documentation index at: https://support.affinity.co/llms.txt
> Use this file to discover all available pages before exploring further.
# Affinity For Salesforce - How To Use Affinity Data To Create Record Triggered Salesforce Notifications
> Help center reference
**Reference** — lookup information.
By following this article, you'll learn how to use Affinity data to automatically send timely Salesforce notifications whenever key record changes occur - ultimately helping your team stay proactive, informed, and more efficient in their outreach.
## Use Affinity data to create Salesforce notifications
* Record-triggered Flows automatically execute actions when a record is created, updated, or deleted.
* You can use Affinity data to create these Flows to automate more of your workflows or create timely alerts. For example, you can create a Flow that is triggered when an existing contact's relationship score is updated or a contact changes jobs.
* Let's walk through the steps for creating notifications with record-triggered Flows. We'll use a job change for this example, but once created, you can use this as a template to create additional record-triggered notifications.
## Example: How to create a record-trigger Flow to notify users about job changes
### Step 1 - Create a new record-triggered Flow
1. From Setup, enter "Flows" in the Quick Find box, then select **Flows**.
2. Click **New Flow**.
3. Select **Start from Scratch**, and then click **Next**.
4. Select **Record-Triggered Flow**.
5. Click **Create.**
### Step 2 - Define the trigger
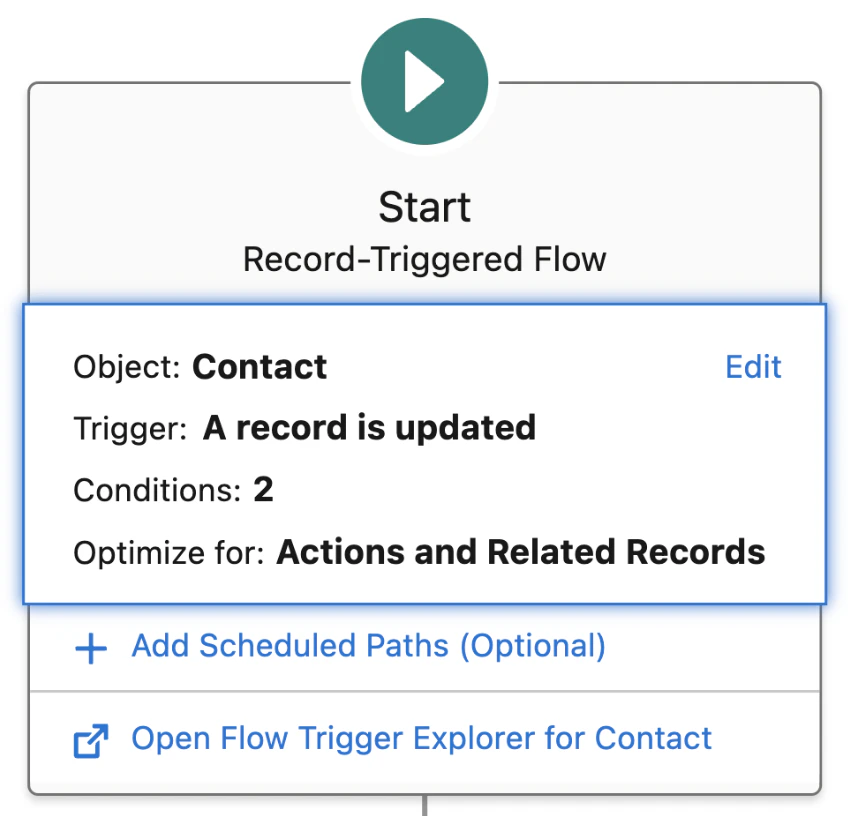
We'll create a trigger for any time a contact's Job Title or Current Company changes. That way, we'll get notified if they completely change jobs or simply change roles within the same company.
1. For Object, select **Contact**.
2. For Trigger the Flow When, select **A record is updated**.
3. For the Condition Requirements, select **All Conditions Are Met (OR)**
* **Note**: If your organization frequently removes job titles or companies from records, you might consider using [custom condition logic](https://help.salesforce.com/s/articleView?id=platform.flow_build_logic_conditions.htm\&type=5#:~:text=Custom%20Condition%20Logic%20Is%20Met) to ignore nulls. This would mean changing **All Conditions Are Met (OR)** to **Custom Condition Logic Is Met**.
4. Define the first condition:
* Field: **Current\_Job\_Title\_Affinity** (*Note: your field might have a different name*)
* Operator: **Is Changed**
* Value: **True**
5. Click **Add Condition**
6. Define the second condition:
* Field: **Current\_Company\_Affinity** (*note: your field might have a different name*)
* Operator: **Is Changed**
* Value: **True**
7. At the bottom of the **Configure Start** window, select **Actions and Related Records**.
 ### Step 3 - Create a new custom notification type
1. In a new tab, go to Setup, enter "Notification" in the Quick Find box, and then select **Custom Notifications**.
2. Click **New**.
3. Select **Salesforce Desktop or Mobile** as your notification type.
* **Note**: You can optionally choose to create a Slack notification.
4. Enter a notification name (e.g. Affinity Job Change Notifications) and description (e.g. Notifies users when their contacts change jobs).
5. Select your preferred notification channels (e.g. desktop and mobile). For this example, we are creating a desktop notification.
6. Click **Done**.
7. Navigate back to the Flow Builder to set up a new element.
### Step 4 - Add a Get Records element
1. Click the plus sign (**+**) below the start node to add a new element.
2. Select **Get Records** from the dropdown.
3. Write "Get Notification Type ID" as the label.
4. Under Get Records of This Object, search for and select **Custom Notification Type**.
5. Filter the notification type using:
* Field: **MasterLabel**,
* Operator: **Equals**,
* Value: **Affinity Job Change Notifications**
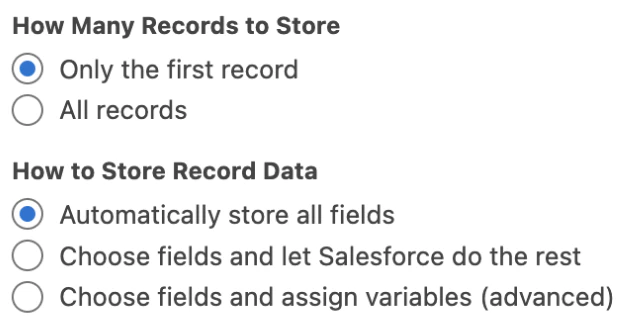
6. Next, you’ll select how many records to store and how to store the record data. Select **Only the first record** and **Automatically store all fields**.
### Step 3 - Create a new custom notification type
1. In a new tab, go to Setup, enter "Notification" in the Quick Find box, and then select **Custom Notifications**.
2. Click **New**.
3. Select **Salesforce Desktop or Mobile** as your notification type.
* **Note**: You can optionally choose to create a Slack notification.
4. Enter a notification name (e.g. Affinity Job Change Notifications) and description (e.g. Notifies users when their contacts change jobs).
5. Select your preferred notification channels (e.g. desktop and mobile). For this example, we are creating a desktop notification.
6. Click **Done**.
7. Navigate back to the Flow Builder to set up a new element.
### Step 4 - Add a Get Records element
1. Click the plus sign (**+**) below the start node to add a new element.
2. Select **Get Records** from the dropdown.
3. Write "Get Notification Type ID" as the label.
4. Under Get Records of This Object, search for and select **Custom Notification Type**.
5. Filter the notification type using:
* Field: **MasterLabel**,
* Operator: **Equals**,
* Value: **Affinity Job Change Notifications**
6. Next, you’ll select how many records to store and how to store the record data. Select **Only the first record** and **Automatically store all fields**.
 ### Step 5 - Add an Assignment element to ensure the right people are notified
1. Click the plus sign (**+**) below the new Get Records node to add a new element.
2. Select **Assignment** from the dropdown.
3. Write "Assign Owner to Notification List" as the label.
4. Go to the Toolbox in the left side panel and click **New Resource**.
5. Fill in:
* Resource Type: **Variable**,
* API Name: **Notification Recipient IDs**,
* Description: List of people who will get notified about job changes,
* Data Type: **Text**, check **Allow multiple values**.
6. Click **Done**.
7. Set variables to:
* Variable: **Notification Recipient IDs**,
* Operator: **Add**,
* Value: Triggering Contact > Owner ID > **User ID**
### Step 6 - Add an Action element to send the notification
1. Click the plus sign (+) below the new Assignment node to add a new element.
2. Select Action from the dropdown.
3. Search and select **Send Custom Notification.**
4. Give the element a name by adding a label (e.g. Send Job Change Notification).
5. Add the new custom notification type ID you just created by selecting **Custom Notification Type ID** under Record Fields in the dropdown.
6. Before adding the notification body or title values, which are the messages the user will see, you must create them. To do so, go back to the Toolbox in the left side panel and click **New Resource**.
* Create the notification body:
* Select **Text Template**.
* Fill out the new resource template.\
For example:
* API Name: \*\*Notification Body \*\*
* Body: Insert resources so the message body automatically updates for every notification. `{!$Record.FirstName} {!$Record.LastName} has an updated job: {!$Record.Current_Job_Title_Affinity__c} @ {!$Record.Current_Company_Affinity__c}` \*\*
* Create the notification title:
* Select **Text Template**.
* Fill out the new resource template.\
For example:
* API Name: **Notification Title**
* Body: `{!$Record.FirstName} {!$Record.LastName}` **has a new job!**
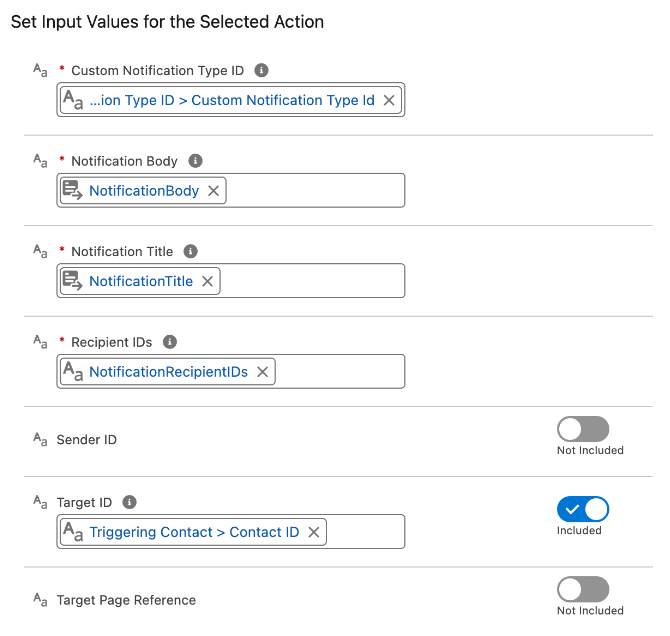
7. Go back to the Action element settings and add the new Notification Body and Notification Title values.
8. Add the new **Notification Recipient IDs** to Recipient IDs.
9. Lastly, toggle the Target ID so it’s included (it will be set to *Not Included* by default) and select **Contact ID** as the value.
### Step 5 - Add an Assignment element to ensure the right people are notified
1. Click the plus sign (**+**) below the new Get Records node to add a new element.
2. Select **Assignment** from the dropdown.
3. Write "Assign Owner to Notification List" as the label.
4. Go to the Toolbox in the left side panel and click **New Resource**.
5. Fill in:
* Resource Type: **Variable**,
* API Name: **Notification Recipient IDs**,
* Description: List of people who will get notified about job changes,
* Data Type: **Text**, check **Allow multiple values**.
6. Click **Done**.
7. Set variables to:
* Variable: **Notification Recipient IDs**,
* Operator: **Add**,
* Value: Triggering Contact > Owner ID > **User ID**
### Step 6 - Add an Action element to send the notification
1. Click the plus sign (+) below the new Assignment node to add a new element.
2. Select Action from the dropdown.
3. Search and select **Send Custom Notification.**
4. Give the element a name by adding a label (e.g. Send Job Change Notification).
5. Add the new custom notification type ID you just created by selecting **Custom Notification Type ID** under Record Fields in the dropdown.
6. Before adding the notification body or title values, which are the messages the user will see, you must create them. To do so, go back to the Toolbox in the left side panel and click **New Resource**.
* Create the notification body:
* Select **Text Template**.
* Fill out the new resource template.\
For example:
* API Name: \*\*Notification Body \*\*
* Body: Insert resources so the message body automatically updates for every notification. `{!$Record.FirstName} {!$Record.LastName} has an updated job: {!$Record.Current_Job_Title_Affinity__c} @ {!$Record.Current_Company_Affinity__c}` \*\*
* Create the notification title:
* Select **Text Template**.
* Fill out the new resource template.\
For example:
* API Name: **Notification Title**
* Body: `{!$Record.FirstName} {!$Record.LastName}` **has a new job!**
7. Go back to the Action element settings and add the new Notification Body and Notification Title values.
8. Add the new **Notification Recipient IDs** to Recipient IDs.
9. Lastly, toggle the Target ID so it’s included (it will be set to *Not Included* by default) and select **Contact ID** as the value.
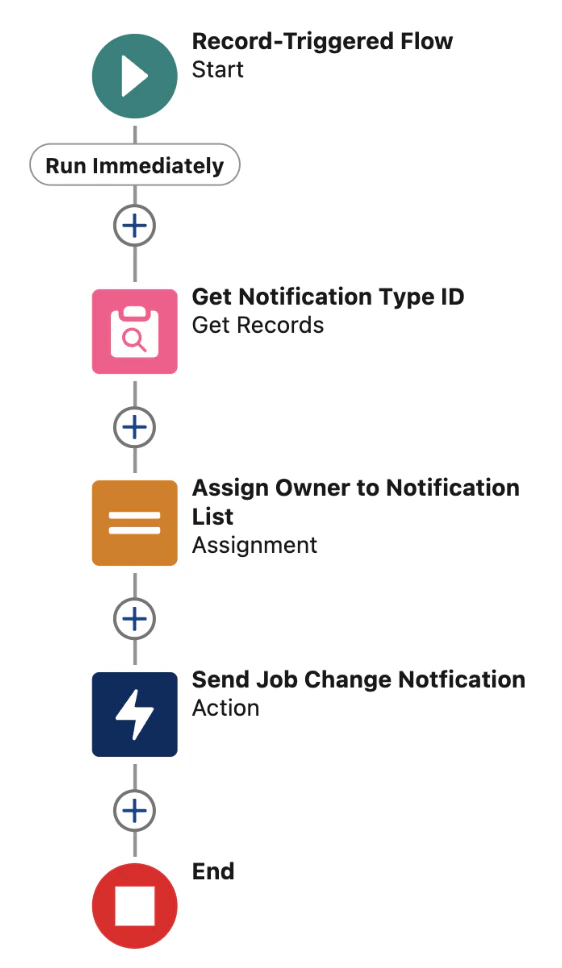
 10. When you’re done building your Flow, it should look like this:
 ### Step 7 - Save, debug, and test your Flow
1. Click **Save** or **Save As a New Version**.
2. Select the **Debug** button and select a Contact to test.
3. Change the Current Company on the Contact record and select **Run**.
4. Once any bugs are resolved, you should [run additional tests](https://help.salesforce.com/s/articleView?id=platform.flow_concepts_testing.htm\&type=5) to ensure your Flow is working as expected.
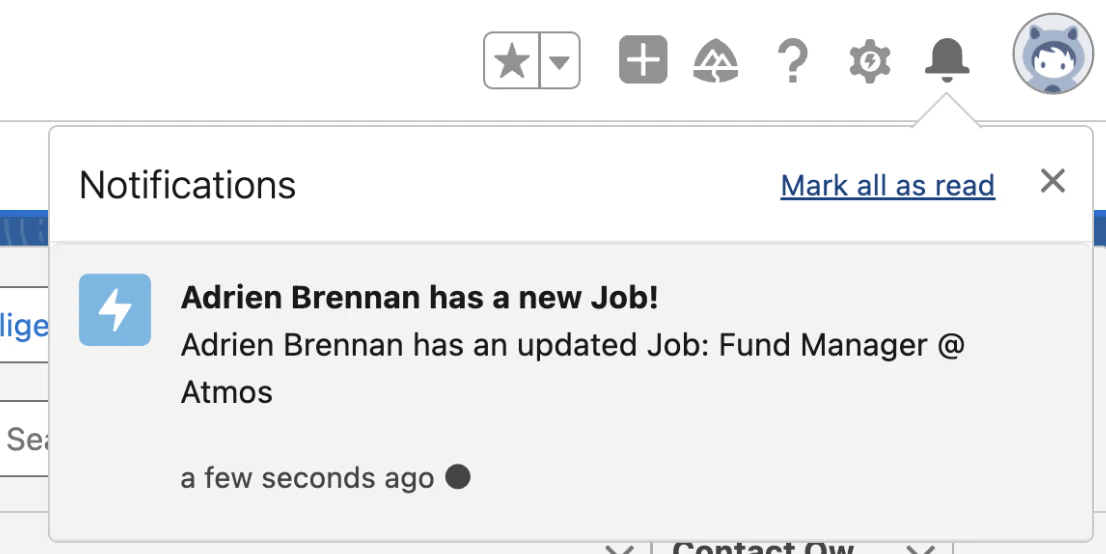
5. Once you’ve activated your flow, head over to a contact that you are the owner of, and try changing their job title or company. If the flow is working, you should see a Salesforce notification that looks something like this:
### Step 7 - Save, debug, and test your Flow
1. Click **Save** or **Save As a New Version**.
2. Select the **Debug** button and select a Contact to test.
3. Change the Current Company on the Contact record and select **Run**.
4. Once any bugs are resolved, you should [run additional tests](https://help.salesforce.com/s/articleView?id=platform.flow_concepts_testing.htm\&type=5) to ensure your Flow is working as expected.
5. Once you’ve activated your flow, head over to a contact that you are the owner of, and try changing their job title or company. If the flow is working, you should see a Salesforce notification that looks something like this:
 ## Additional record-triggered notification types
### For accounts
* **Funding updates**: You can trigger notifications when the Last Funding Date or Total Funding Amount (USD) fields change.
* **Investor changes**: Send notifications when the Investors field is updated.
* **Headcount or growth signals**: Create alerts if Number of Employees, or Employees (Current), Employees (3/6/12/24 Months Ago), or Employee Departures/Hires (Last 3 Months) fields significantly change.
* **Industry shifts or location changes**: Notify users if the company's Location or Industry fields are updated.
* **New relationship introduction**: Use the Source of Introduction field to prompt notifications when a new introduction or referral is logged.
### For contacts
* **LinkedIn profile updates**: If the LinkedIn URL or LinkedIn Profile Headline changes, send notifications.
* **Contact information changes**: Set up notifications when the Phone Number or Last Email Used fields change.
### For both accounts and contacts
* **Activity-Based Notifications**: Create triggers when First Email, Last Email, First Meeting, or Last Meeting dates change.
## Additional record-triggered notification types
### For accounts
* **Funding updates**: You can trigger notifications when the Last Funding Date or Total Funding Amount (USD) fields change.
* **Investor changes**: Send notifications when the Investors field is updated.
* **Headcount or growth signals**: Create alerts if Number of Employees, or Employees (Current), Employees (3/6/12/24 Months Ago), or Employee Departures/Hires (Last 3 Months) fields significantly change.
* **Industry shifts or location changes**: Notify users if the company's Location or Industry fields are updated.
* **New relationship introduction**: Use the Source of Introduction field to prompt notifications when a new introduction or referral is logged.
### For contacts
* **LinkedIn profile updates**: If the LinkedIn URL or LinkedIn Profile Headline changes, send notifications.
* **Contact information changes**: Set up notifications when the Phone Number or Last Email Used fields change.
### For both accounts and contacts
* **Activity-Based Notifications**: Create triggers when First Email, Last Email, First Meeting, or Last Meeting dates change.